SHELTER
Not surprisingly, the first thing that comes to mind when one thinks of camping is a tent! Tents are classified by size, material, weight, weather durability, etc. They range from cozy single occupancy to multi-room structures with several entrances. Below are some basic types of tents. Additionally, consider a tarp: While the tent is very important, the tarp is too. Although not particularly a necessity, tarps can protect the tent from tears by rocks and rough terrain below, and also from wet and soggy ground. 
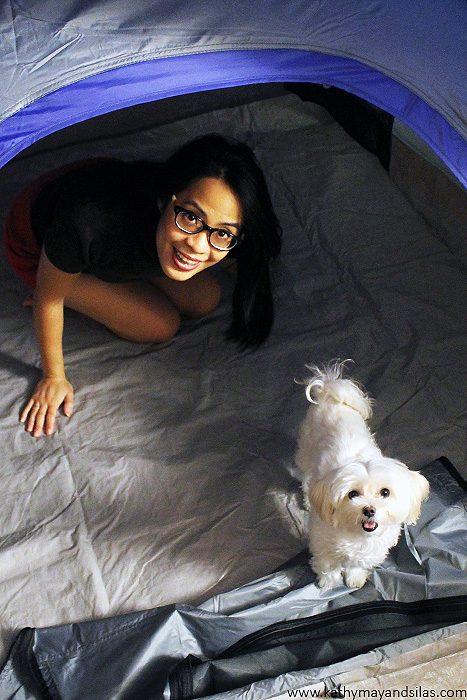 Dome tent: The dome tent (A) is the most popular type of tent for casual campers. Two to three curved poles intersect at their centers to support this tent. Dome tents are free-standing structures that can be picked up and moved versus staked down. They provide plenty of head room compared to the footprint.
- Hoop tent: Similarly to the dome tent, the curved structure of the hoop tent (B) allows precipitation to slide off of the tent. Hoop tents consist of arches of poles arranged in series.
- A-frame tent: The A-frame tent (C) is simple and classic. A single horizontal ridge pole is supported by two poles on each side that meet at an apex. A-frame tents are less roomy because of the steep sloping sides.
The forecasts for our desert destinations called for a whopping 0.5” rain per month so we anticipated little need to shelter from rain, sleet, or snow. We purchased a three-person tent which is ample room for just the two of us, our equipment, plus Mimi when she joins us on future trips. We also opted for a heavy-duty polyethylene tarp similar to what we use on the Habitat for Humanity construction sites. While ground moisture was less of a concern for the present trip, the tarp protected from rocks that may cut the tent.
SLEEP
When it comes to staying warm, the sleep system is one of the most important factors of camping. We prioritized this for two reasons: Firstly, the desert’s lack of humidity prevents retention of heat radiating from the ground after the sun goes down; this means that it gets cold at night! Secondly, Kathy May is always cold no matter what! Thanks to the warm sleeping bags from Silas’ parents and from Kathy May’s medical school friend, Sam, we were able to save a few dollars for this trip. We did, however, investigate sleeping pads. These are certainly not a necessity; however, they’re not exactly a luxury either, especially on camping trips that are days-long. Look for the “R-value” which denotes insulating capacity. In addition to providing warmth, sleeping pads also ensure better rest and comfort, a reward after days of grueling hikes and exhausting travel.

- Air: Inflating sleeping pads (A) are the most comfortable of camping sleeping pads. Some disadvantages include poor insulation, need to pump or blow up, and, most of all, propensity for puncture and leakage. Camping mattresses (B) are hybridized with air mattresses. Creative alternatives include pool rafts or floats; interestingly, many inflatable sleeping pads are advertised to double as flotation cushions!
- Self-inflating: To use a self-inflating pad (C), roll it out, open the one-way valve, allow air to enter, and then close the valve. These are not as thick as air pads and are therefore less comfortable; however, they are more compact and light.
- Closed-cell foam: This dense material is designed to prioritize insulation over comfort. They are no-nonsense – just open and use – and can also function as sitting pads. On form is (D) an roll-up style; another is (E) accordion style. Creative alternatives are yoga mats, Kindermats, and interlocking foam tile or puzzle mats.
- Alternatives: Cots are a possibility, or even simply pillows, blankets, and comforters. Most basic of all is the classic pile of boughs and leaves (that are placed under your tent, of course), which provide both cushion and insulation.
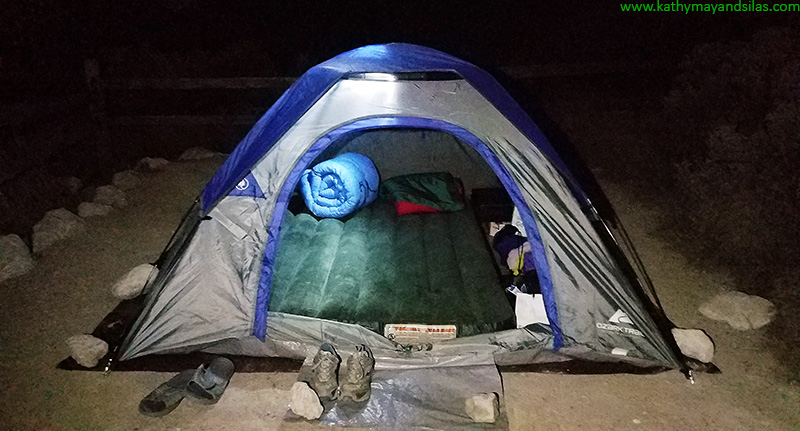
In honesty we scoffed when our friends mentioned that campers bring air mattresses to the great outdoors, but we surprisingly settled upon a camping mattress, which is just that! Our single height, full-size camping mattress is a cheap, simple option that ensured comfort over a week of sleeping on the ground, in a desert environment without soil, grass, or leaves to soften our slumber. It has a battery-operated pump for inflation in minutes.
FOOD
In case you’re wondering (we were) – no, the romantic idea of cooking over the fire is not advisable… unless you are just roasting marshmallows. It is inefficient and will burn cookware! Burying foil packets in mature coals is possible, but at the risk of carcinogens. Camp stoves are a much better idea. There are many options, with considerations of your desire for a home-cooked meal versus just boiling water, as well as factors such as portability, weight, and fuel.

- Petroleum stoves: Petroleum stoves (A) are fast and effective, even at very low temperatures; however, they may not be ideal for backpacking because of their weight and bulk. They utilize easy-to-find white gas, kerosene, jet fuel, or even gasoline that is poured into a reusable fuel canister and then pressurized by hand pump. It’s easy to see why these can be messy and dangerous!
- Liquid gas stoves: These are easy to use and efficiently utilize pressurized butane, isobutane, or propane with a clean burn; however, fuel can be expensive and canisters are not refillable. Tabletop burners (B) are analogous to gas ranges with which we’re familiar – the fuel container screws into the system. Alternatively, canister stoves (C) are great for backpacking – the stove screws directly onto the fuel container.
- Chemical solid fuel stoves: Of all the options, this is the most simple, small, and light. Many stoves are even foldable (D)! Fuel tablets, or small blocks of organic compounds (hemamine, Esbit, Triox, and more), are burned. Unfortunately, each tablet only lasts a few minutes, does not generate much heat, and can leave a brown sticky residue on cookware.
- Alcohol stoves: Alcohol stoves (E) may utilize cans that look similar to the heat element under the chafing dishes at catered events. Or, they can even be homemade from tin or aluminum cans! Though they are simple and clean-burning, they do not generate a great deal of heat.
- GORP: Especially with car camping but even with backpacking, camp stoves are not a necessity! You could always go with “good old raisins and peanuts” and other foods that don’t require cooking or refrigeration. Breads, peanut butter, canned meats and fish, cereal, bars, are some ideas. Don’t forget to stash some chocolate, candy, cookies, and cake!
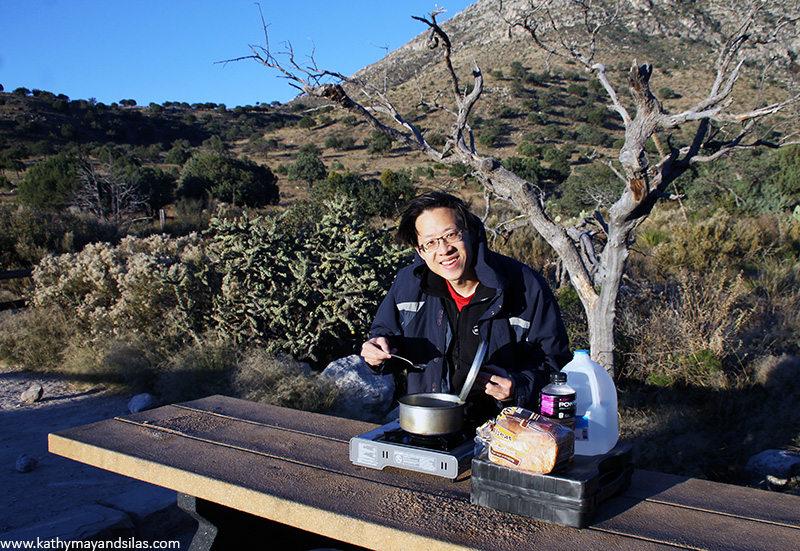
We opted for a simple tabletop butane stove with a single burner, effective for boiling water and heating foods in a small pot. Screw the canister into the stove, turn the dial, and then light!
SAFETY
- Illumination:
- A lamp with a hook is very helpful. It can be hung from the inside of the tent for illumination while you’re in it; while it’s hung the tent will glow to provide ambient light while you’re outside of it. It can also be carried with you during short walks.
- We also prioritized bright handheld flashlights with wide fields to light our way. In addition to standard sized flashlights, we also carried smaller convenient cylindrical flashlights to easily stash in our bags and pockets. We brought along a tactical flashlight, too, given to us by Kathy May’s brother Tom-Vinh.
- We found head lamps incredibly useful. Being hands-free allowed us to pitch our tent, cook food, explore caves, and go on short walks to the washroom in the darkness. They virtually obviated the need for handheld flashlights (though, once again, it was helpful to keep a mini cylindrical flashlight for convenience in case we didn’t have access to our hook lamp or head lamp. When strapped to a water jug, they also provided great ambient light similar to another lamp.
- Electricity: Our destinations were very remote, sometimes miles away from electricity and cell phone signals, and hundreds of miles away from cities. However, being the unfortunate modern creatures we are, we needed some volts to charge our electronics.
- Electronics that we brought included: Mobile phones, camera batteries, dash cam, action cam. We also brought a small netbook to transfer the thousands of pictures we take from memory cards to a portable hard drive.
- An car AC power inverter is one of the best car-related purchases we’ve made (for camping and not). It plugs into the cigarette lighter and provides DC-to-AC sockets, as well as additional USB charging ports and a 12V cigarette lighter socket. Ours is even shaped to fit into the cup holder.
- We couldn’t run our car all the time to run the AC inverter, so we brought our rechargeable high-capacity battery pack for emergency power (mostly our mobile phones). Don’t forget to put your phone in airplane mode if you’re remote with absolutely no signal to prevent unnecessary power depletion.
- You’ll need to consider alkaline versus rechargeable batteries for your lights, pumps, walkie talkies, etc.
- First-aid kit: This list seems extensive but one can tailor the supplies to his/her particular trip and pack it in a compact area. You should consider the following.
- First-aid supplies such as adhesive bandages, gauze, antiseptic topicals, antibiotic topicals, sterile wipes and rinse.
- Topicals such as hand sanitizer, soap, sunblock, sunburn relief, bug spray, sting relief.
- Medicine such as ibuprofen, acetaminophen, hydrocortisone, antihistamine, Epi pen, anti-diarrheal meds, antacids, cough drops. Don’t forget your typical prescription meds too.
- Miscellaneous supplies such as surgical gloves, tweezers, safety pins, scissors, scalpel, utility knife, duct tape.
- Campfire: Though it’s a core idea of “camping,” our desert destinations banned campfires for obvious reasons. We’ve received a good deal of advice on campfires but thus far do not have firsthand experience; we’ll update this as we try it out in the future!
Well, there you have it! That’s basically everything that we know about camping so far! We are mere novices (as suggested by the fact that we went car-camping as opposed to backpacking). Surprisingly, it can be expensive to live in the wilderness, and some equipment is costly. However, most equipment requires one-time investments only, or gadgets that we use in our everyday lives anyway, so we were able to find a budget-friendly way to be comfortable during our camping road trip! If you have any tips on frontcountry camping, please do share them below in the comments! We would appreciate more tips and learning from you!
Until next time,
Kathy May and Silas

Mimi is a happy, peppy pup and the theme we chose was equally fun and playful. For the basics of the main design elements, we used pre-made vector files of a simple house from clker and anthromorphized flowers from freepik. There are innumerable free vectors available online, and a large advantage of vector art is that they can be imported into Adobe Illustrator to save a great deal of time in the design stage.

That being said, there was still a great deal of legwork to be done to modify the vector art into Mimi’s design (don’t worry, we won’t go into the nitty gritty in this post). In addition to tweaking the vector art, we also added other details including Mimi’s name to customize the design. After finalizing the design, we prepared the Illustrator file for the laser cutter. The instructions for the laser cutter – engrave, line, cut, etc. – are communicated via color. In this image, for example, cyan commands “vector cut”; navy blue commands “vector line”; and black, royal blue, and red command variable depths of “engrave.”
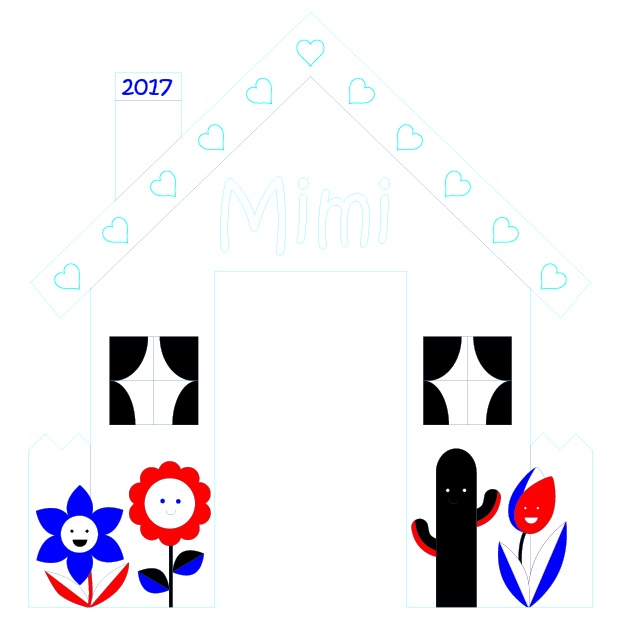
Next, we were off to Boston Makers, the non-profit makerspace in Jamaica Plains where we volunteer! Its laser cutter, 3D printers, and more are open to the community – let us know if you’re interested in dropping by! We imported our Adobe Illustrator file into Corel DRAW, which is the program the laser cutter utilizes to translate color (as above) to command. We selected 1/4” birch plywood for Mimi’s door. Here are a couple of 30-second videos of the laser cutter at work:
After cutting and engraving, we sanded the door to remove smoke stains from the laser cutting process. To prepare it for the outdoors, we sprayed it with two coats of Thompson’s WaterSeal Waterproofing Wood Protector. While at Boston Makers, we devised a way to mount Mimi’s door onto the balcony. Our solution was to design and 3D-print two C-hooks that would clamp the door to the bottom horizontal rung of the balcony. Here is a clip of the LulzBot as it is 3D-printing our C-hooks:
Back at home, we cut a Mimi-sized peephole from the wind barrier panel and slid the top of the house under the barrier’s fastener. The bottom of the house is held in place with the 3D-printed C-hooks. Here’s the final construction!
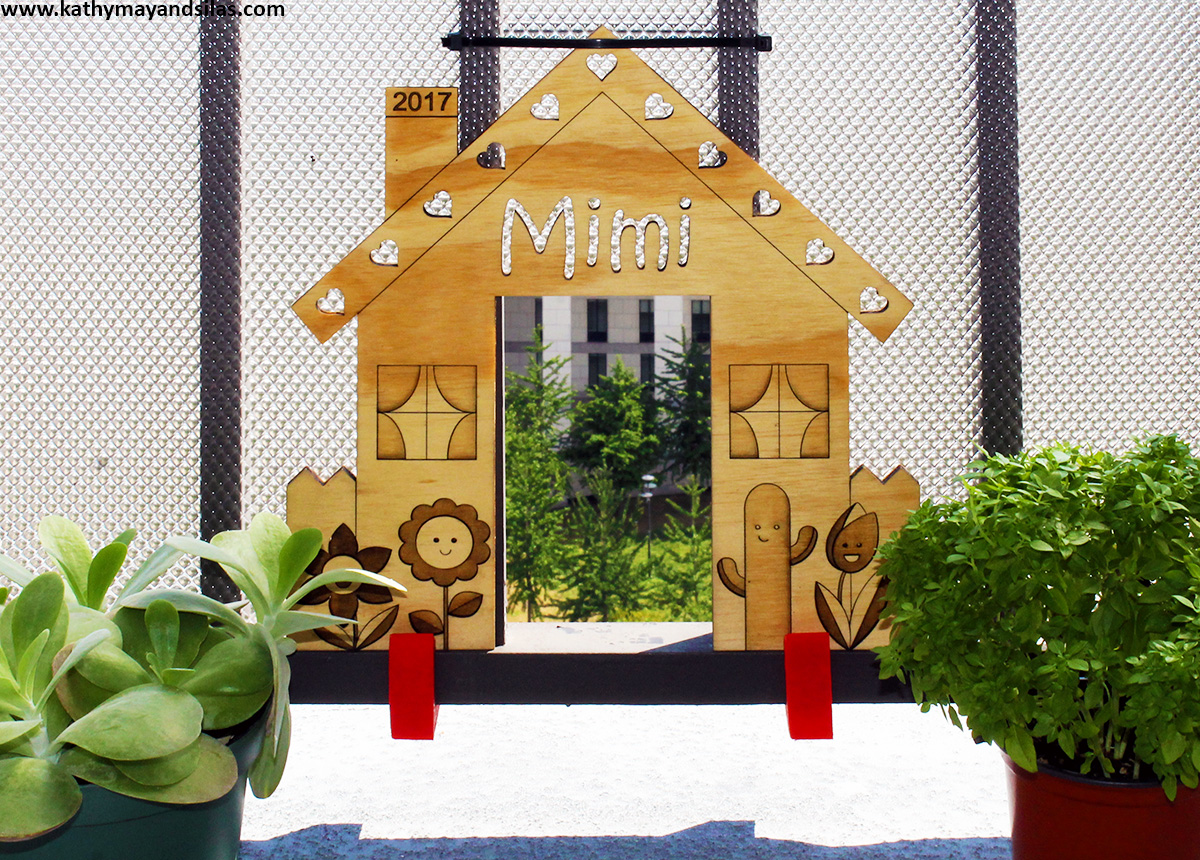
Mimi loves her new doggie door! She is again able to enjoy her view of the city below and to get a nice whiff of fresh air at her leisure! Click on the gallery images below to see some snapshots of her enjoying the balcony. By the way, we loved her door so much that we laser-cut a second copy to paint and display indoors. A picture of that is included in the gallery too!
Until next time,
Kathy May and Silas
To start our project, Kathy Mây sketched the design. We decided to go with a clean image, one that was bold enough to reflect the confidence and showmanship that is typical of the Rooster.
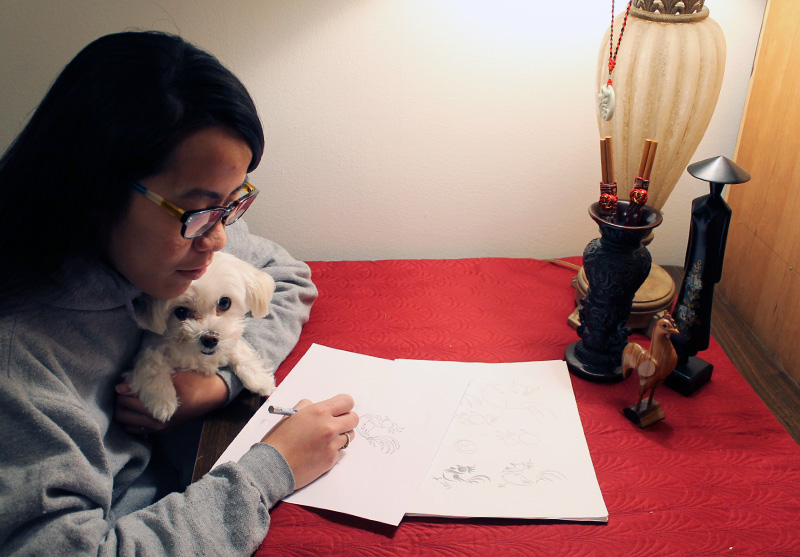
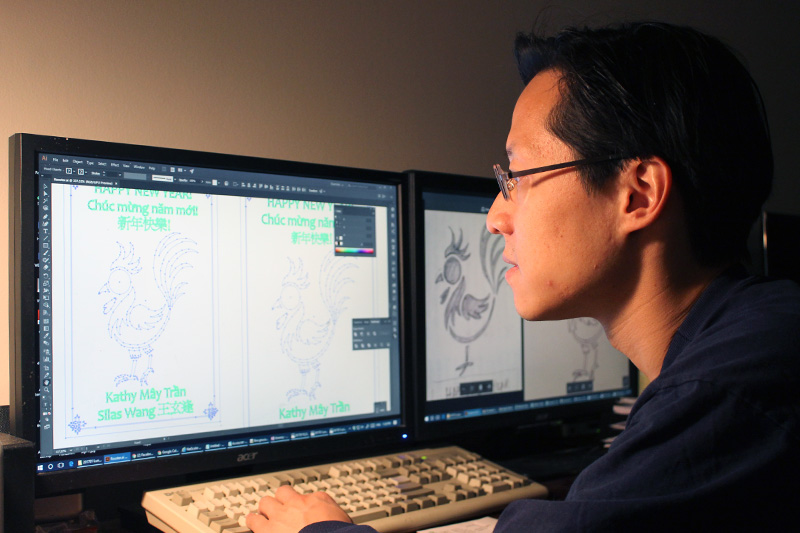
Silas scanned the sketch into the computer. He used Illustrator to trace it and then clean it up into a final vector drawing that can be understood by the laser cutter. He then added trilingual text and a simple East-Southeast-Asian inspired design that did not overwhelm the Rooster, who thrives upon being the center of attention. In the Illustrator file, different colors corresponding to different laser settings.
We used the laser cutter at Boston Makers to complete our project! Based in Jamaica Plain, Boston Makers is a nonprofit organization that provides a collaborative workspace to encourage creativity and engage the maker spirit in the community – young and old, gals and guys, novices and experienced makers of all kinds! We have been volunteering there as hosts to staff the space and help people use the equipment to create their projects. If you are interested in learning or pursuing 3D printing, soldering and electronics, textiles and fabric arts, woodworking, arts and crafts, or any other kind of project, please let us know in the comments below!
We decided to use regular red posterboard, knowing that only the outside paper was dyed red; the internal layers are uncolored paper that would show up as a light brown. On the laser cutter, we used both the engraving and cutting functions. Click on the short video below to see the process in action:
Each rooster card was 65 x 95 mm, the perfect size to fit in a red envelope.

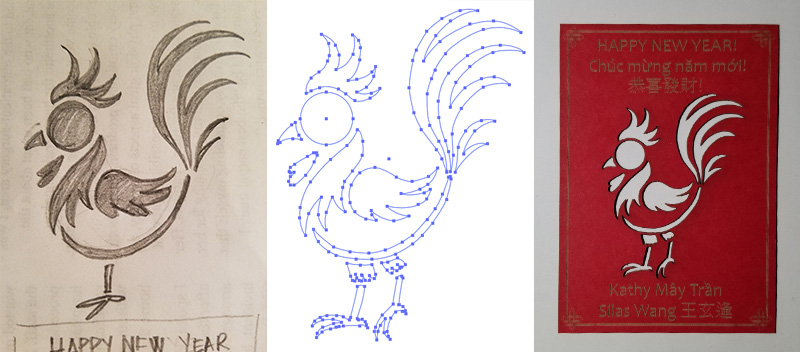
Here is the card evolving through its stages of creation, from sketch to vector art, to finished product!
In addition to the Rooster card, each red envelope also contained our annual picture – in color coordination, of course – to commemorate the Lunar New Year.

Happy Lunar New Year! This year we wish you peace, happiness, good health, and anything your heart desires!
Chúc mừng năm mới! Năm này mình chúc bạn bình an, hạnh phúc, sức khỏe, và vạn sự như ý!
新年快樂! 恭禧發財!
Until next time,
Kathy Mây and Silas
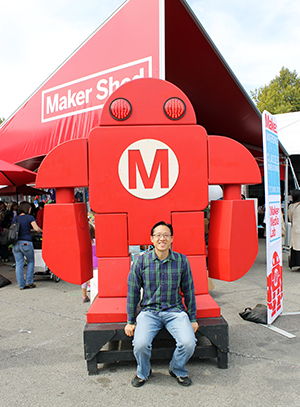 Just because we moved out of NYC doesn’t mean that we would miss one of our favorite events of the year: World Maker Faire! How do we explain Maker Faire? It’s an exhibition, festival, and celebration of technology, crafts, engineering, robotics, and everything DIY. It’s a gathering of inventors, tinkerers, scientists, artists, builders – all of whom are makers in their own domain. Held at the New York Hall of Science, the World Maker Faire is the largest of the international series; October 1-2, 2016 was the 7th annual event.
This year, we were thrilled to explore Maker Faire with Jon, Lily, and Jen! We chatted with creative minds of all ages and sizes and types. We learned about the latest machines, gadgets, and doodads. We heard about projects that others are pursuing and picked up ideas and tips for our own. We even made some things right then and there during the faire. Most of all, we had lots of fun!
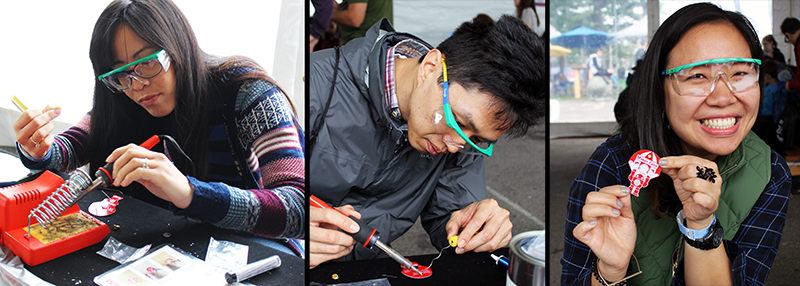
This is the first year we’ve participated in one of the most popular Maker Faire activities: learning to solder. Donned with Google safety glasses, we soldered a battery holder, pin, and LED to a printed circuit board in the shape of the Makey Robot. So easy and fun!
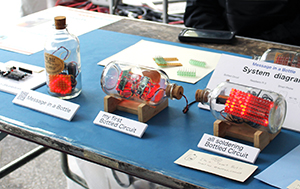 In the Maker Shed, we saw a vast array of innovative projects. One of our favorites was the circuits-in-a-bottle project by Kimio Kosaka. Incredibly, all the parts are soldered together inside the bottle. Unfortunately, this picture does not do this creative project justice! We were too busy marveling and asking questions. See more details on Kimio’s DIY video!
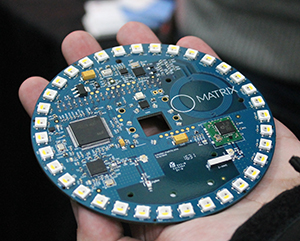
Maker projects spanned from fun at-home endeavors to commercial ventures. For example, we loved the MATRIX Creator, which is basically a Raspberry Pi add-on pre-built with a number of sensors and microcontrollers, powered by a proprietary (secret algorithm) operating system. Its capabilities are endless and clearly largely unexplored! Watch our video below to see one potential functionality: Face detection, tracking, and interpretation (also featured: our silly facial expressions :-P).
We tried our hand at single-pin lock picking. The instructions are much more easily explained than executed. Of our group, only Lily was successful! Here she is “supervising” Silas and Jon sweating away, hard at work.

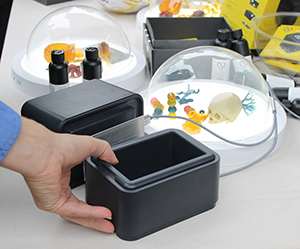 Years ago, at our first Maker Faire, we saw our first 3D printer. In a shockingly short amount of time, after decades of utility in industrial fabrication, these have now become mainstream. The MakerBot Replicator and even Formlabs Forms are old news and companies are now striving to distinguish themselves. Nowadays, you can 3D print plastics, metals, clay, rubber, even chocolates. We saw many examples of great efforts: printers which used plastic waste instead of filament or resin, others which printed and mixed different colored plastic, etc. We were most impressed by the ONO, the first-ever smartphone 3D printer which raised over $1 million on Kickstarter in just 5 days! A tray filled with DLP resin sits over the smartphone. This resin hardens with exposure to normal visible light. An app displays patterns on the screen to harden the resin while a moving platform pulls the hardened resin up so that the next layer can be printed. It should be available in the U.S. soon!
Check out this Knitting Printer, an awesome invention brought to us by Asbjørn Rørvik and Fredrik Fjellså from Norway! We were entranced by the process. So far it looks like its functionality is limited to making tubes – socks, scarves, and Dachshund sweaters… but who can have enough of those?! By the way, the component parts of these automated knitting machine were 3D printed, too!
Here are some other pictures of our highlights during the day!
1. Jon listening to knitting. Teresa Lamb wears a harness and arm-piece which translates the movements of knitting into sound.
2. Lily jamming out on a ukelele programmed with Arduino.
3. Kathy May operating Shaper Origin, the world’s first handheld CNC machine. It’s totally portable and self-guiding!
4. Silas examining water bears AKA tardigrades (indestructible micro-animals that can survive in outer space) under the microscope.
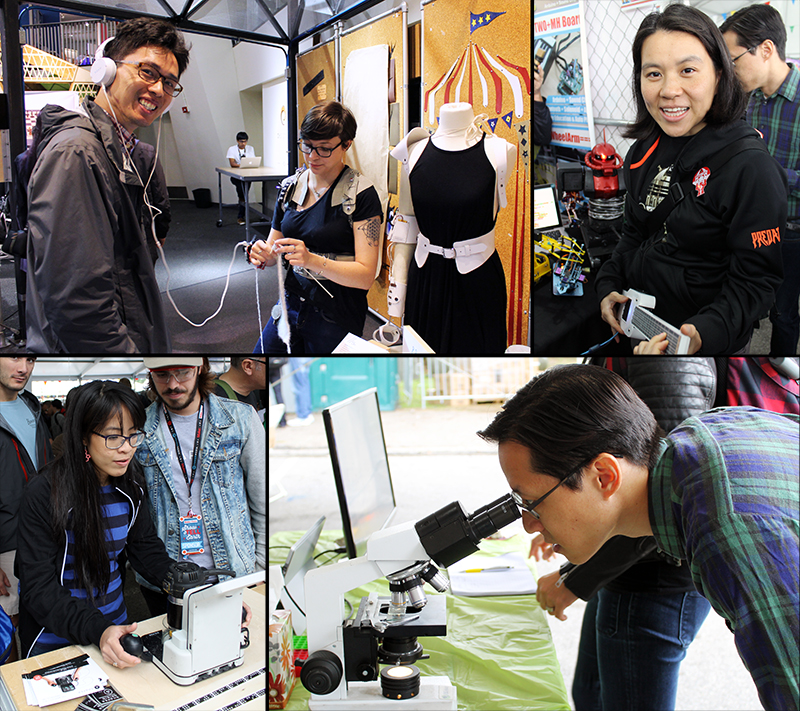
Check out our gallery for more Maker Faire pictures that we couldn’t fit into the body of this post!
[See image gallery at www.kathymayandsilas.com]Until next time,
Kathy May and Silas
The basic concept behind how the smart mirror works is that the one-way mirrored glass allows light coming from behind the glass to shine through but is reflective like a regular mirror wherever it is dark behind the glass. The tablet would display white letters on a black background so that the tablet itself would be as invisible as possible but the text would appear to be floating on the mirror.
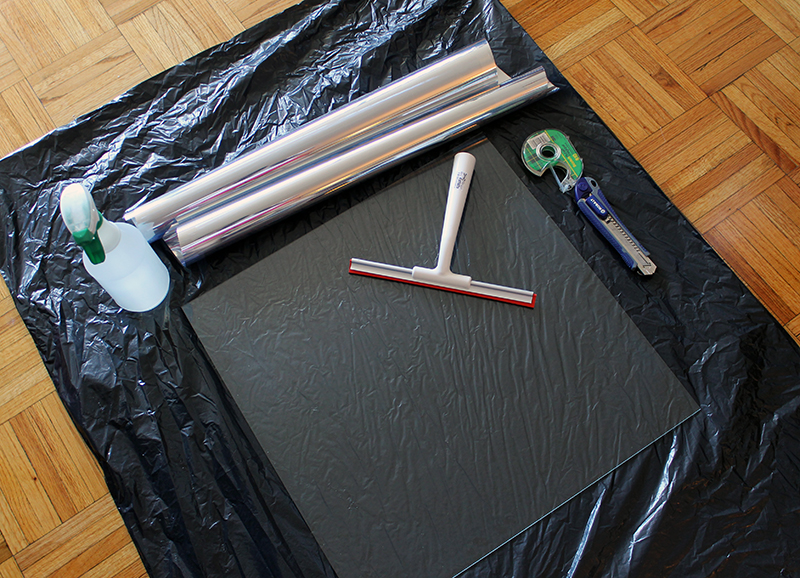
We decided that the best combination of fast and cheap would be to apply mirrored window film to a picture frame and to use an old Android tablet for the display. These are the materials that we used:
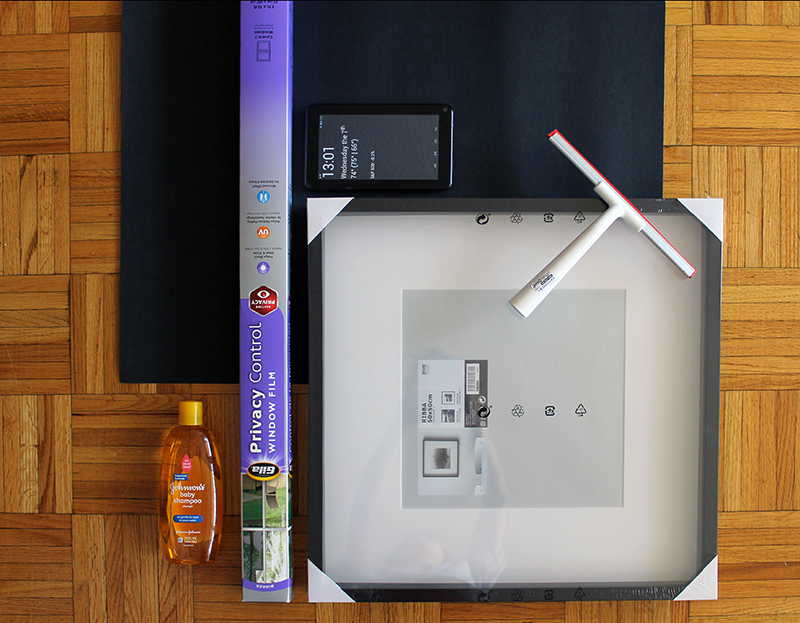
- Picture frame. You should choose a glass frame with a depth sufficient to contain your tablet and cord. We used a black IKEA RIBBA frame, 19.75” square (50cm square), $14.99.
- Mirrored window film. We decided on Gila privacy film, which we purchased on Amazon for $26. For other brands, variable opacities are available. One roll is plenty to make many mirrors.
- Baby shampoo and spray bottle. This is for the solution you will use in the application of film to the glass.
- Squeegee. We bought ours at IKEA with the frame for $1.99.
- Black posterboard. The backing which will accentuate the reflection of your mirror.
- Utility knife. To trim your film.
- Tablet. We used an old Android tablet which we no longer use. It’s an Azpen tablet which we bought at Micro Center years ago for about $30.
- Mirror app. Two apps that have been made available through Google Play by their authors are Wall Mirror and Home Mirror. Another app that is not on the app store but can be installed directly is Speculum.
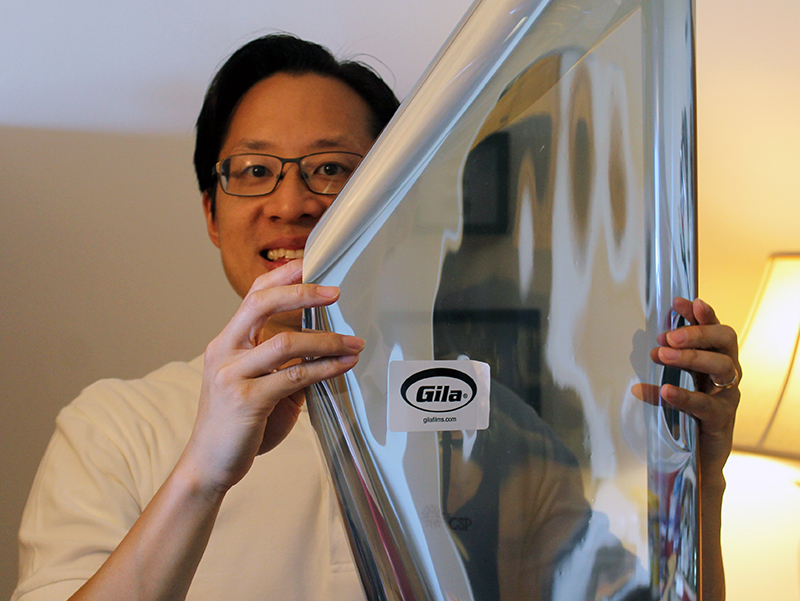
An alternative to using mirrored film on glass to create your mirror is to use acrylic or glass that is one-way mirrored (also known as two-way mirrored), which would replace the glass in your picture frame. These can be bought locally if you have a shop nearby or ordered over the Internet for delivery. Either way, they can be cut to order. A disadvantage of acrylic, however, is warping which is especially evident in larger sheets. Both mirrored acrylic and glass are expensive; a sheet of mirrored acrylic for a project comparable to ours would be around $65. We decided to go with film on glass, which is significantly cheaper, especially since the glass comes with the frame. Disadvantages include the patience and attention to detail required to apply the film evenly without bubbles or bumps. If you already have experience applying window film to your house or car, it should be easy. Otherwise, be sure to watch a video to learn the technique so that you have good results.
The mirrored window film is translucent when viewed from dark-to-light; it is opaque and reflective when viewed light-to-dark.
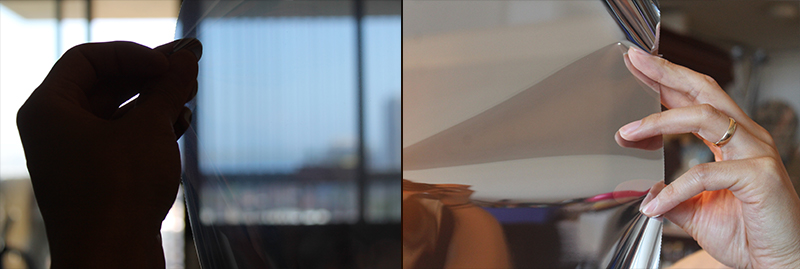
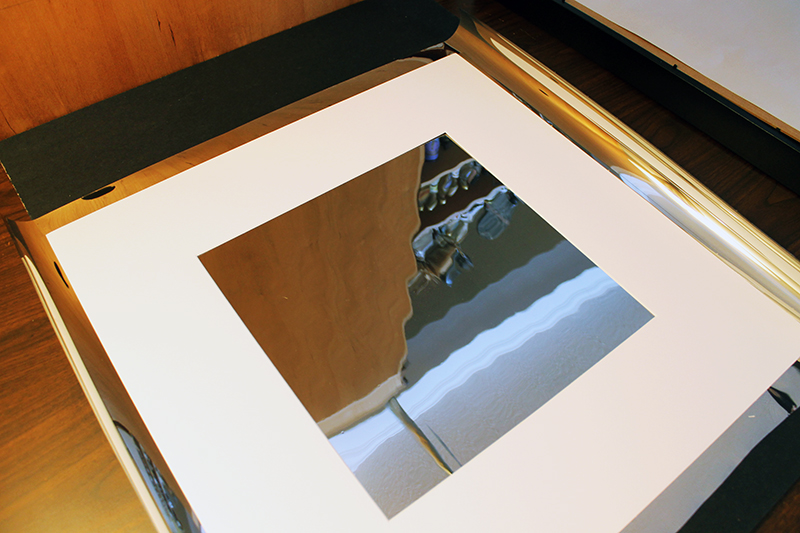
Cut the mirrored window film to the size of your frame, with at least an inch to spare on every side. An easy shortcut is to put the glass (or matting, if you have it) onto the sheet as a quick guide. The film will be trimmed; your cuts do not have to be straight.
Get ready for the application of film to glass. There is water involved! We put a garbage bag down to contain the mess. Also, do this in as dust-free an environment as you can find. Even miniscule particles and fuzz will show between the film and glass.
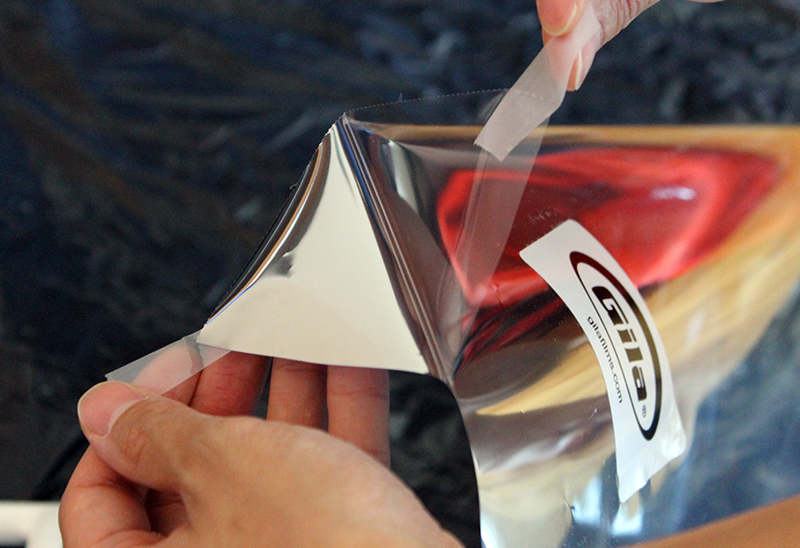
A great tip we learned that will certainly applicable to other projects is from Gila’s website: Apply scotch tape to the film side and the liner side for easy, quick separation without damaging the film.
Make your application solution in a spray bottle. Mix 1 quart of water with 1/2 cap of baby shampoo. Lay down your film with the side previously abutting the liner facing upwards. Lay down your glass alongside. Spray the solution onto both of these surfaces – be generous.
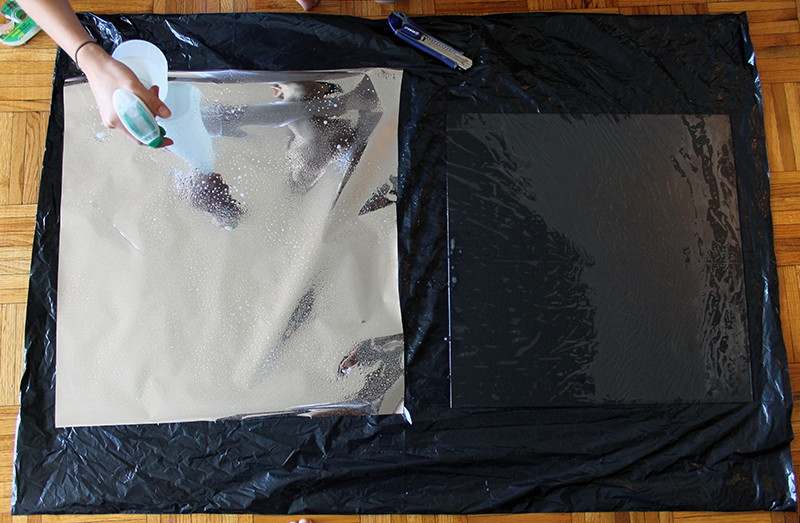
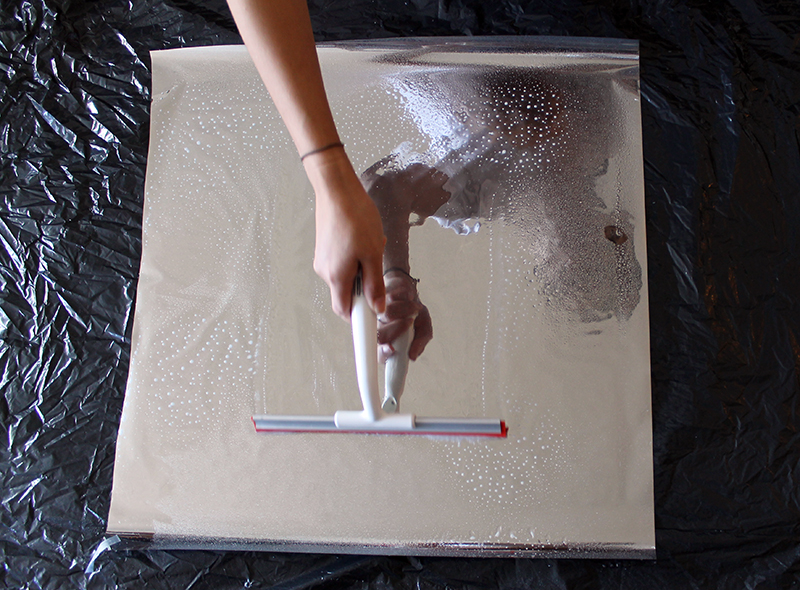
Apply film to the glass with the side of the film previously against the liner now against the glass. The two wet sides creates surface tension to hold the film to the glass. Next, spray the dry surface of the film – again, be generous. Use your squeegee to smooth out the film over the glass, removing wrinkles and bubbles as you see them. This works much better than trying to apply film dry! If you see any particles, you can lift the film to remove them and then continue.
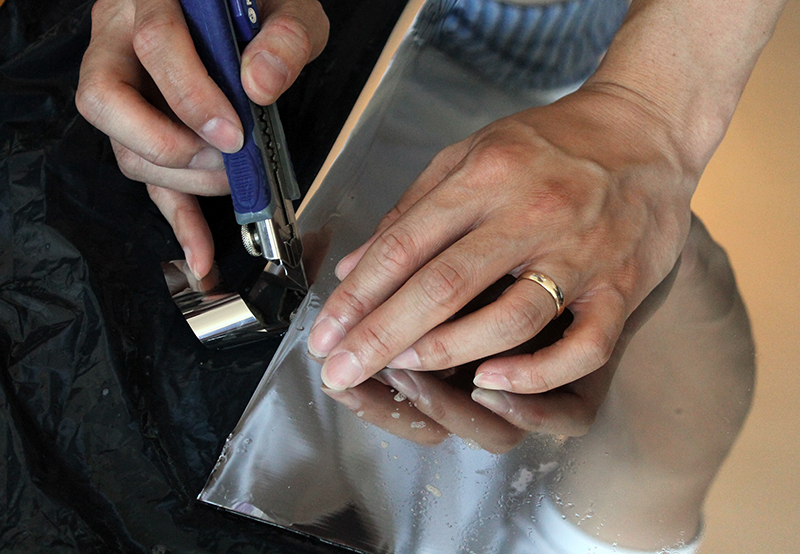
Trim the edges of the film by cutting along the perimeter of the glass with your utility knife. Use the edge of the glass itself as the guide. Try to be precise, because if you have excess film, it can lift up when you place the glass into the frame.
Next, in one corner of your black posterboard, cut a window that is the size of your tablet screen. The black against the mirrored window film will emphasize its reflective quality. Then construct some cardboard pieces to support the tablet and keep it in place. An alternative would be to tape the tablet in place but that makes it difficult to remove the tablet to make changes. After you’ve done this, it’s time to assemble your mirror! Place your film-covered glass into the frame (glass will be the outside; film will be the inside). Next goes your black posterboard and then the tablet, face-down, followed by the cardboard support and the backing for the frame.

We cut a hole in the cardboard for the tablet’s AC adapter cord to run; we also cut a corner of the frame’s backing for the same reason.
There are various options for the information display. We decided to use an app called Wall Mirror that Nick Hall wrote for his own smart mirror. It is available through the Google Play store and has an easy-to-use configuration tool to customize the display. You can see in the photos that we are using the time, date, weather, birthday, and calendar modules. This needs to be set up before putting the tablet into the frame. Since we didn’t tape down the tablet, however, it is very easy to remove the table to make changes. Using a premade app is the quickest way to getting the smart mirror up and running, and it requires no coding. Alternatives to using a premade app might be to write a custom app or to use a website displayed in a full-screen browser. Alternatives to using a tablet might be to use a Raspberry Pi or other miniature computer with a monitor.
In fact, now that we have the basic smart mirror working, we plan to upgrade it and build a more customized version. In order to accommodate the functionality we have in mind, we will look into using a Raspberry Pi with a monitor. Some ideas that may possibly make it into the project include:
- More detailed calendar and weather information
- Motion or proximity detection to turn off the screen when nobody’s looking
- Face recognition using a camera, so that the display is customized depending on who’s in front of the mirror
- Voice commands, for example to show more detailed information or to perform Google/Alexa/Cortana searches
Stay tuned for more posts as we build the next version of our Magic Mirror! Please let us know if you have built something similar or if you have any suggestions for us!
Until next time,
Kathy May and Silas
PS. Here are some of the tablet smart mirror projects from which we drew inspiration:
]]>We had been hearing about the Arduino for a while since attending our first NYC World Maker Faire a few years ago, and we decided that this was a perfect project to make use of one. Basically, an Arduino is an inexpensive microcontroller that can be programmed like a very simple computer to check inputs such as buttons and sensors, run some logic, and drive outputs such as lights and motors. A thermostat system, for example, would use a temperature sensor as an input to decide whether the HVAC should be on or off, and a servo motor and an output to physically control the HVAC unit. The Arduino by itself has no Internet capability, but add-on components that add Ethernet or WiFi abilities can easily be attached.
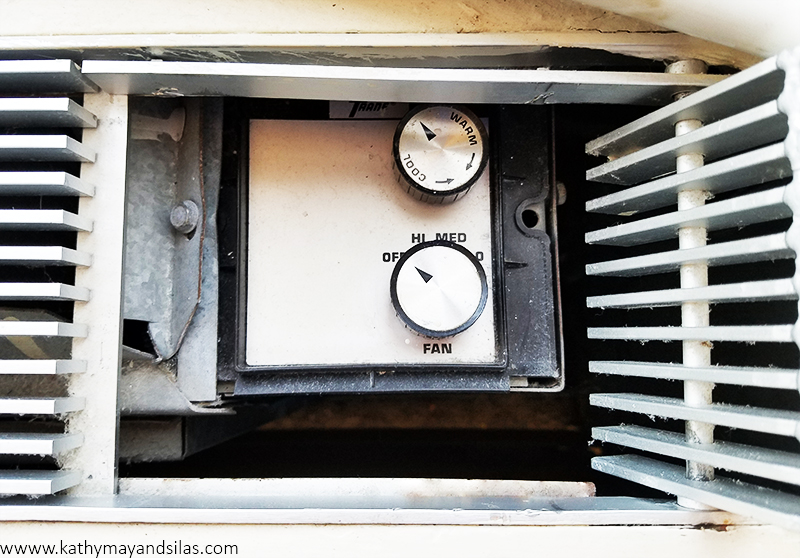
Our HVAC unit is controlled by a knob that turns the unit on or off, with several fan settings (high, medium, low). A second knob helps to control the amount of heating or cooling by cycling the heat transfer on and off. It’s not very efficient because the fan stays on at all times, and since you can’t set a temperature you basically have to guess how far to turn the knob to get the amount of heating or cooling you want. We wanted to build a system that would allow us to set a temperature like a thermostat and also to allow us to control system remotely (because who needs to go all the way across the room to turn the unit on and off?). Having it Internet-enabled would even allow us to turn the system on before reaching home, so that the apartment would already be warm when arriving home on those cold winter nights.
So far, our system has the following features:
- Measures and displays the current temperature in Celsius and Fahrenheit.
- Turns the HVAC unit on and off mechanically via the knob on the outside of the unit, in response to a direct on/off command or to maintain a set temperature.
- Reports the temperature and status to a web interface.
- Accepts commands through the web interface.
Here is a short video showing the system in action:
The system that we built has four principal components:
- Physical interface with the HVAC
- Arduino hardware not including the interface with the HVAC
- Arduino software (sketch)
- Web interface

In this post we will give an overview of each of these components. In future posts we hope to be able to go into each in a bit more detail.
1. Physical Interface with the HVAC
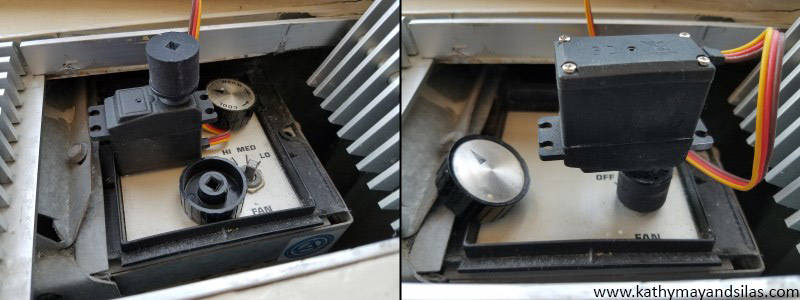
Instead of connecting to the wiring inside the control panel or to the power supply of the HVAC unit, we decided to build a mechanical interface to control the unit from the outside. This allows us to avoid working with high-voltage AC and allows the HVAC unit to be restored to its original condition easily. This mechanical interface obviously varies according to how the HVAC unit is designed, while the rest of the project is fairly independent of the design of the actual unit. Our HVAC unit is controlled by a knob that attaches to a shaft with a square cross-section. This is fortunate, because a servo motor can be used to turn the shaft directly on the same axis. A servo is a motor that can sense its own rotational position so that you can set it to turn to a specified position. This works well for us because we want to turn the shaft to the specified on and off positions.
 All that we need is a way to connect the servo to the shaft. Although we could have just glued the wheel horn directly to the knob, it would prevent us from restoring the HVAC to its original state. We thus 3D-printed a plastic knob with a square hole that we could permanently attach to the servo wheel horn. Since the geometry was not complex, we designed it quickly in Autodesk’s free 123D Design software. Since we don’t have a 3D printer (yet), we uploaded the design to Shapeways, which is a service that 3D-prints your design in whatever material you choose and ships it to you. The right image above shows the servo motor coupled to the HVAC control shaft.
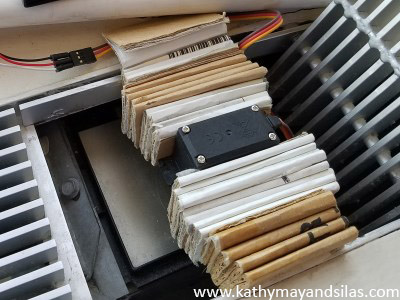
In order to hold the servo in position and provide counter-torque when the servo is turning, we used cardboard temporarily to hold it against the sides of the cutout of the HVAC enclosure. In the future we would build a more permanent and elegant mount for the servo but this works for now.
Here is a video of the servo in action:
2. Arduino Hardware
For our prototype, we used an Arduino Uno compatible board, which uses the ATmega328 controller chip at its core. We also used an Ethernet shield, which is an add-on board that provides access to wired Internet. We chose Ethernet because it is simpler to configure than WiFi and is more reliable, which is better for initial experimentation.

We used the following additional components for our project. Much of these came from online or Tinkersphere, a robot and electronics hobby shop in the Lower East Side of NYC.
- DHT11 temperature sensor (also measures humidity)
- Serial 8×8 LED matrix module with built-in MAX7219 driver chip, to display set and current temperatures
- Pushbutton to manually override the system to turn on or off
- RGB LED to indicate online status
- LED to indicate HVAC on/off status
- SPST switch to turn the temperature display on and off
- Breadboard, wires, resistors for the LEDs, DC barrel power jack for the AC adapter
The servo draws power directly from the AC adapter rather than the Arduino since the amount of current that the Arduino can supply is limited and the knob shaft requires a decent amount of torque to turn.
In order to get the temperature sensor further from the HVAC, we cut a 3.5 mm audio extension cable (which has 3 wires, matching the 3 connections that the DHT11 sensor needs) near the female end. The cut end of the short segment with the female jack connects directly to the board, and the cut end of the long segment with the male plug has the sensor soldered to it. Thus, in the future if we build an enclosure for the project, the temperature sensor can be plugged into the jack on the side of the enclosure like a pair of headphones plugs into a computer.
Although the system would have a web interface, we decided that it would also need a physical interface that shows the temperature and allows for manual control so that we wouldn’t have to go to the web all the time. We used a pushbutton to allow for override control to turn the HVAC on or off without thermostatic control. We used the 8×8 LED matrix to display the current and set temperatures in Celsius and Fahrenheit in a cycle that can be turned off with the switch.
3. Arduino Sketch
To program an Arduino to do what we want it to do, we write a program, or sketch, in a modified form of C/C++ using the free Arduino IDE (integrated development environment) on a computer. The sketch is then compiled and uploaded to the Arduino board via USB cable. It runs automatically when the board is powered up. Unlike a computer, there is no operating system or multitasking. The sketches are much simpler and smaller than your average computer program. On the popular Uno model of the Arduino, there is only 32 KB of program space and 2 KB of RAM! However, the power of the Arduino is in the ease with which the sketch communicates with the outside world through easy access to GPIO (general-purpose input and output) pins on the board.
Most home automation projects have very simple logic at their core, and so the Arduino has more than enough power to control this type of project. The logic behind a thermostat is very simple. If the room temperature is below the set temperature, turn the heat on. If the room temperature is above the set temperature plus a certain threshold, turn the heat off. And it would simply be the opposite for cooling.
Adding some bells and whistles such as communicating to a webserver does add to the complexity of the sketch, but the great thing about this kind of project is that you can add one piece of functionality at a time; it’s not necessary to plan out the whole project in advance.
Here is a basic schematic outline of our sketch. We hope to be able to go into a more detailed analysis in a future post. We used the following libraries: dht11 for the temperature sensor, Servo to control the servo, SPI and UIPEthernet for the Ethernet shield, SimpleTimer to run code at specified intervals, and LedControl for the LED matrix display.
The main thermostat function does the following: reconnect to the Internet if necessary, read the current temperature from the sensor, check the server for a new command, execute the thermostat logic (turn the HVAC system on or off depending on the temperature), send the current temperature and system status to the server, and display the current temperature on the LED matrix display.
The setup function connects to the Internet and sets up a timer to call the main thermostat function (above) each minute. The loop function checks the pushbutton that allows us to manually turn the unit on or off as well as the switch that turns the temperature display on the LED matrix on and off.
4. Web Interface
We want to be able to control and monitor the system using the web. This allows us to set the thermostat or simply turn the HVAC on or off without having to get up and walk all the way to the unit. It also allows us to start heating the apartment before reaching home!
The Internet-enabled Arduino can either be set up as a server or a client. With the Arduino as a server, we would send HTTP GET or POST requests to it directly to control the system, and it would serve up the user interface to our browser as HTML. However, we decided to use the Arduino as a client, requesting commands and posting its status to a hosted web service. Thus, the web server is an intermediary between our browser and the Arduino. This design has the advantages of not having to set up a static IP address for the Arduino, providing greater functionality (since the webserver has much more computing power than the Arduino itself), and allowing us to work on the user interface updates without having to remove and reprogram the Arduino.
Currently we have the Arduino set up to report the current temperature and system status (on or off, manual override or thermostat control) to the server once a minute. At the same time it will query the server to see if there is a new command. A simple web page provides an interface that we can access from any computer or smartphone, allowing us to see the temperature and status, as well as to change the set temperature or override it on or off.
Future Directions
There are some features that we have in mind that we are working on implementing in the future:
- Improving the web interface including designing a smartphone app
- Moving from the Arduino Uno to an Arduino Nano or other small version of the Arduino, and from breadboard to soldered perfboard
- Building a more permanent mount for the servo and an enclosure for the electronics
- Adding the ability to set programmed times with different temperatures – right now our schedules are not the same from one day to the next so this is not important to us
Even at this stage, we have been enjoying our first Arduino DIY home automation project! Being able to turn the heat on and off before reaching home makes living in the apartment much more comfortable, as does letting the Arduino maintain a steady temperature without having to get up and turn the unit on and off manually. We hope to go into more detail about each of these components sometime in the future, but hopefully this gives you a basic overview of our project. We hope that this gives you some inspiration and ideas for your own projects. Do you have any suggestions for our project? Please tell us about your Arduino and home automation projects in the comments!
Until next time,
Kathy May and Silas
3D Origami: Introduction
3D Origami: Part 1 – Fold the Component Pieces
3D Origami: Part 2 – Make a Ring Base
3D Origami: Part 3 – Coming Soon!
3D ORIGAMI: PART 2 – CREATE THE RING BASE
Now that you have made a large pile of triangular component pieces (see “Part 1: Fold the Component Pieces“), we can start to build a ring base! A ring base is a versatile foundation for any 3D origami creation. On the left is a ring base alone; on the right is a ring base as the foundation of a 3D origami swan.
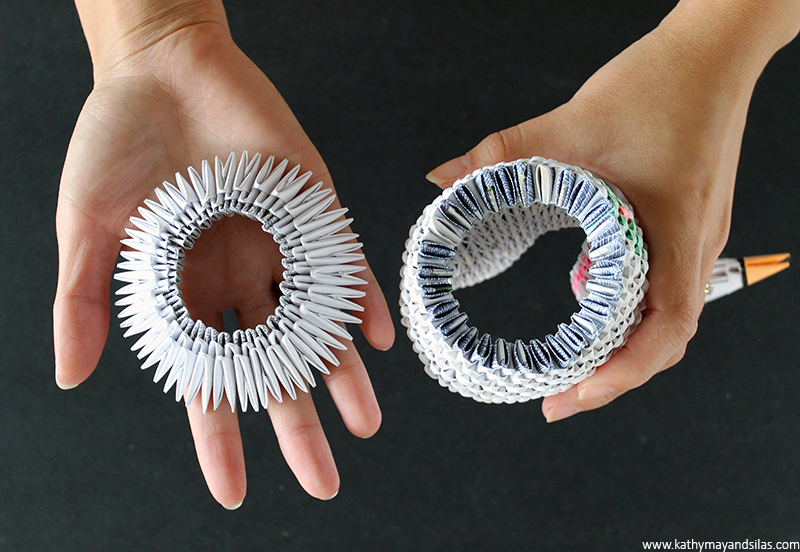
In this tutorial, we will make a ring base of 30 component pieces. Please note that you may alter the number of component pieces in your ring base to make larger or smaller 3D origami creations. Shall we begin?
1. First, make sure you have a sufficient number of component pieces. For a ring base of 30, you will require 60 component pieces for the base itself. Of course, you should make extra for the rest of your origami sculpture.
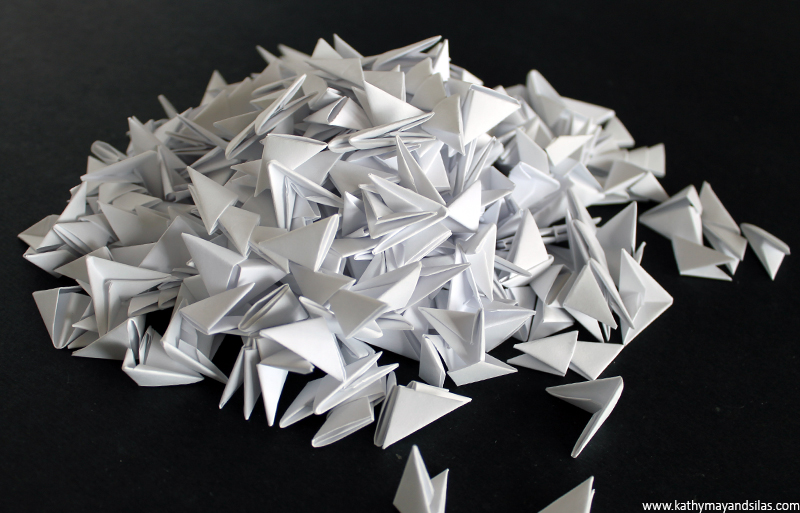
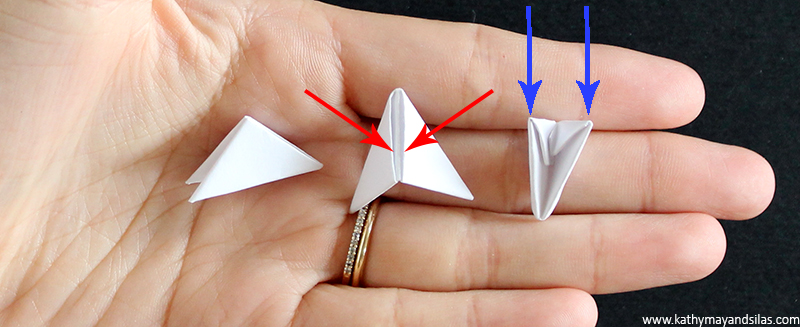
2. Note that each component piece is a right triangle. One leg of the right triangle has two “pockets” (red arrows) while the other leg has two “wings” (blue arrows).
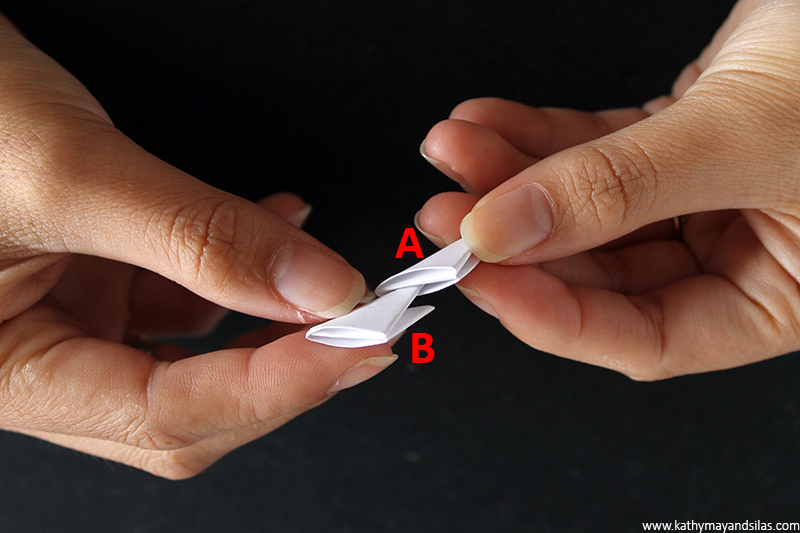
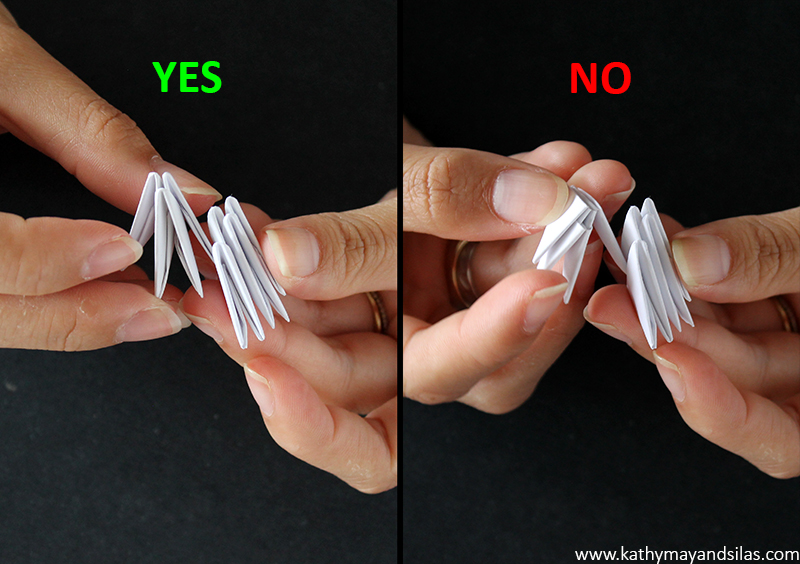
3. Insert the left wing of one component piece (B) into the right pocket of another component piece (A). Make sure that the component pieces are facing the same direction (i.e., that the right triangle component pieces are parallel).
4. Then insert the right wing of a new component piece (C) into the other pocket (A).
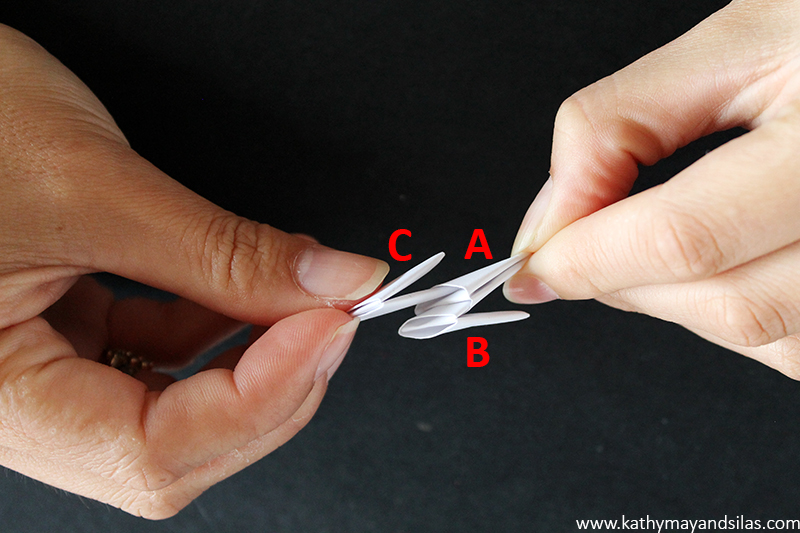
Here’s what your 3-component-piece unit should look like from the front and back, front and side.
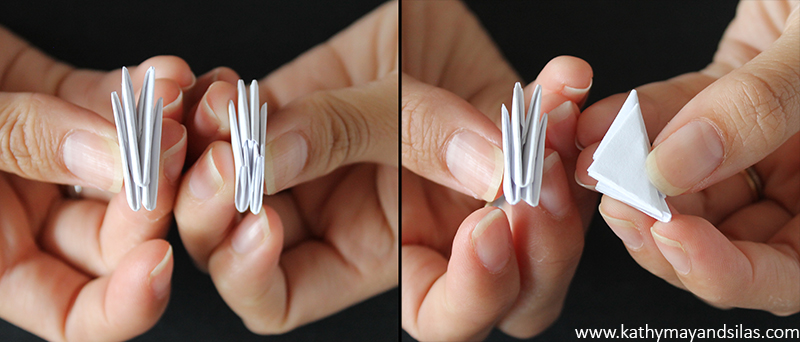
5. Repeat Steps 3 and 4 with new component pieces until you have 15 sets of 3-component-piece units.
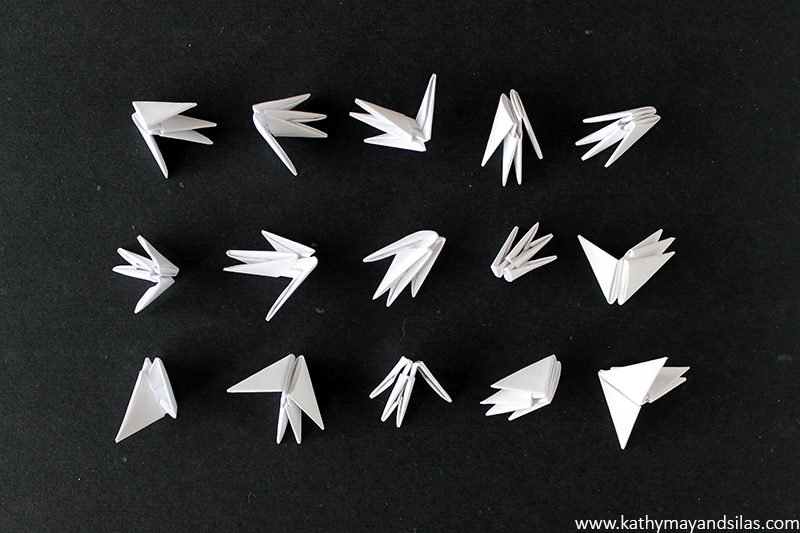
6. Hold 2 sets of your 3-component-piece units (E & F) side-by-side. Take a new component piece (D) to join these 2 sets together. The right-most wing of E should go into the left pocket of D; the left-most wing of F should go into the right pocket of D.
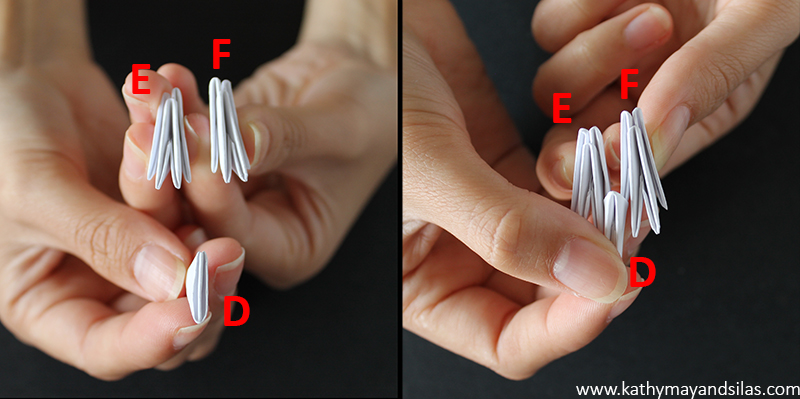
Now you have created a 7-component-piece unit. Here’s what it should look like from the front and back.
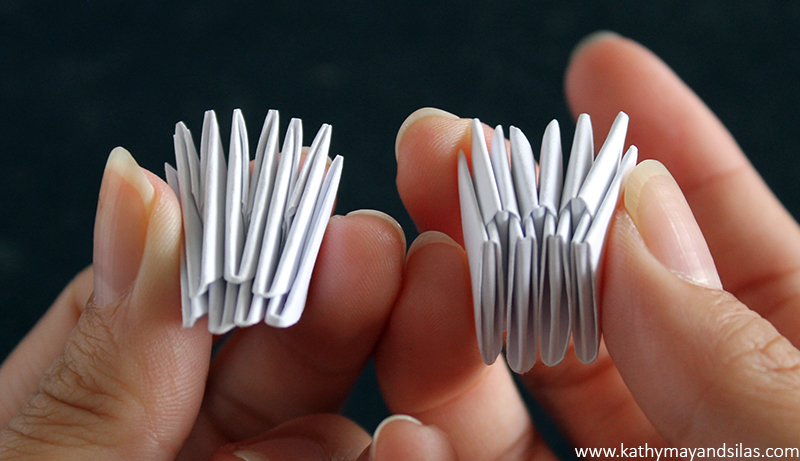
7. Repeat Step 5 until you have 7 sets of 7-component-piece units. Since we have an odd number, the 8th set will be a 3-component-piece-unit, which I’m holding in the picture.
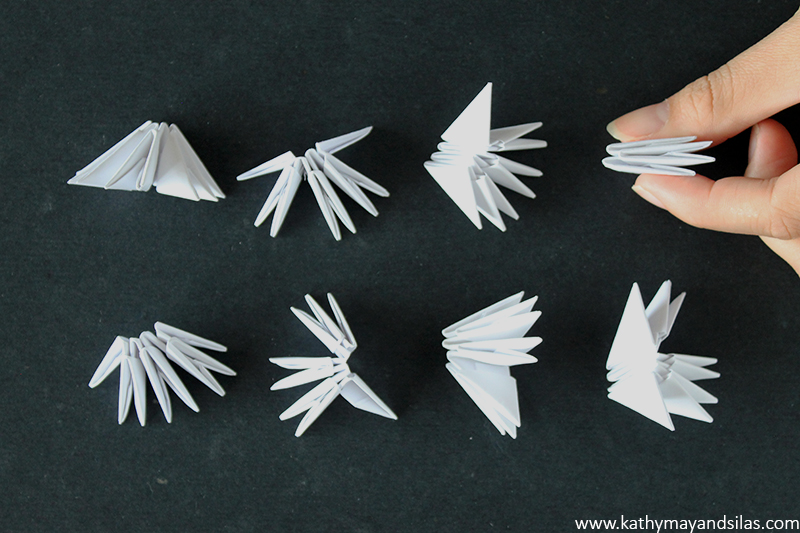
8. Hold 2 sets of 7-component-piece units side-by-side. Take a new single component piece to join these 2 units together. This is analagous to the previous step – you’ve got the hang of it! We are assembling these in smaller units because assembling a long chain becomes unwieldy!

9. Continue joining sets until you’ve made a semicircle. Make this a complete circle by using your final single component piece to join together the wings on either side of the semicircle.
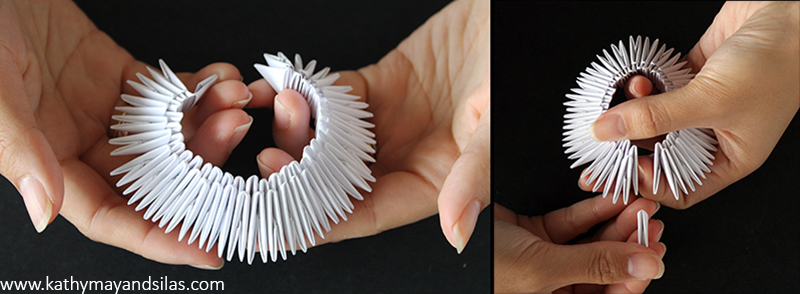
10. There you have it – you’re done! You’ve made a ring base of 30. It should feel sturdy at this point, not requiring glue. You can tighten it (but not too much, please) by pushing the outer layer into the inner layer of component pieces. As we add more layers later, the structure will be further strengthened. Here is a view of the top and bottom of your completed ring base.
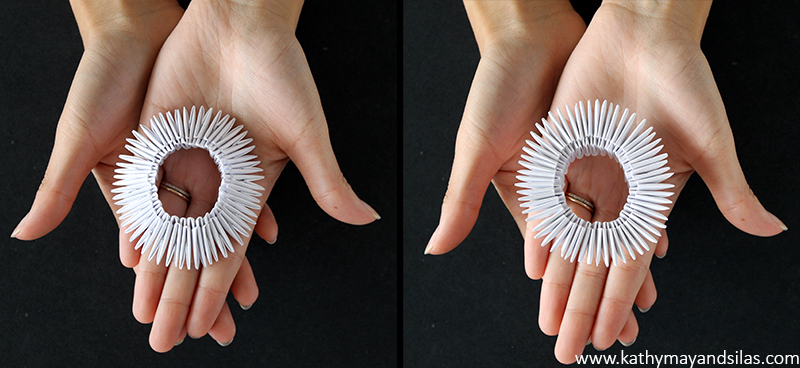
The entire process of modular origami is very simple once you have learned the basics. Here are a couple of images to help with troubleshooting. If you have any questions, please leave me a comment below and I’ll be happy to help!
Troubleshooting #1: Make sure that the correct wing of your component piece goes into the correct pocket of another component piece.
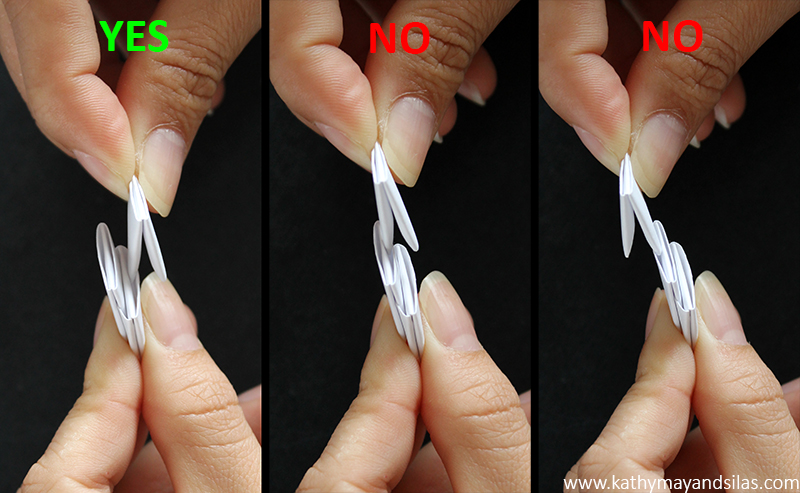
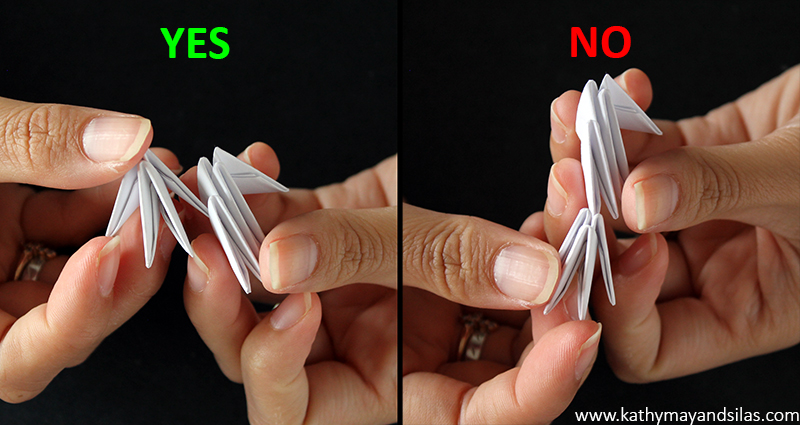
Troubleshooting #2: Make sure that all of your component pieces are facing the same direction (i.e., all hypotenuses of all component pieces should be parallel).
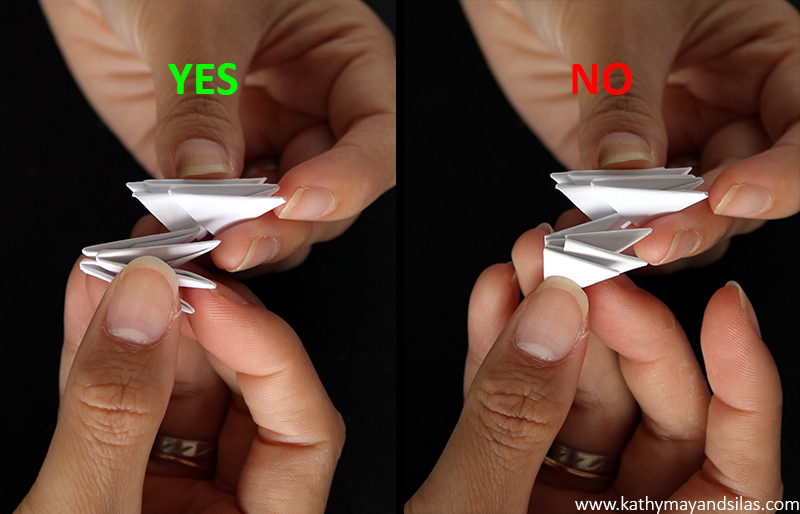
Congratulations on making your 3D origami ring base. Hopefully you made many more than 60 component pieces so that we can go onto Part 3. Stay tuned – happy folding!
Until next time,
Kathy May and Silas
VISIT ALL THE POSTS IN OUR 3D ORIGAMI HOW-TO SERIES!
3D Origami: Introduction
3D Origami: Part 1 – Fold the Component Pieces
3D Origami: Part 2 – Make a Ring Base
3D Origami: Part 3 – Coming Soon!
]]>In preparation of making our pysanky, we required a number of specialized equipment. Even though pysanka-making kits are available, we opted to pick and choose our supplies. We bought them at an authentic Ukrainian shop in Lower East Side, Manhattan (Arka on 2nd St at 1st Ave). Here’s what we got:
- Egg blower – optional! As children, Kathy May’s mom taught her and her brother to blow eggs the old-fashioned way. Having a tool to blow eggs, however, makes the process easier and faster. There are a few types of egg blowers. Some, like our S-shaped blower, require lung power to blowing out the egg. Others utilize an accordion or ballon pump to remove contents.
- Kistka – the stylus that will dispense the wax. Available are: traditional (wooden handle with copper funnel and wire), Delrin (thermoplastic with brass funnel), and even electric kistkas. They are available in fine, medium, or heavy funnel sizes. Fine is a necessity for detailed designs; medium is most versatile; and heavy is helpful for filling in larger areas. Each of these were about $2.

Kistkas in three sizes: two fine, two medium, and one heavy - Beeswax – much softer than typical candle wax. Natural or black colors are available in small blocks. If the natural-colored beeswax is used, one may use soot from the kistka/candle to darken the wax and allow visibility when it is applied onto the egg. We decided to go the easier way and buy a beeswax with black coloring from the get-go.
- Dyes – not your typical food dye or Easter egg dye. These are acid-based that are distributed as powders in small envelopes. The most basic traditional colors are yellow, red/orange, green, brown and black. Nowadays, they’re available in all colors of the rainbow.
- Varnish – We settled on an oil-based polyurethane from a local hardware store. Polyurethane is easy to find, but the tradeoff is it causes whites to yellow over time. There are a number of alternatives, but make sure to avoid non-clear and water-based options!
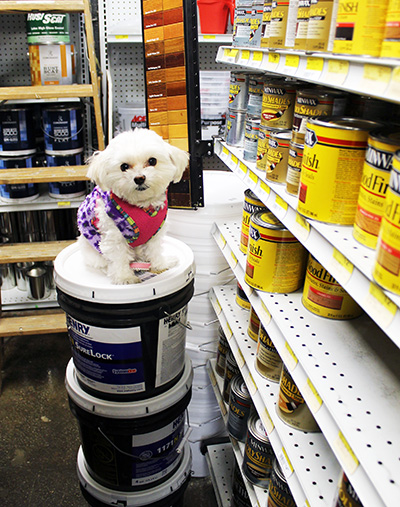
In addition to the more specialized supplies above, you will also require a number of household supplies:
- Egg – with as few defects as possible. As the pysanka dye is acid-based, sequential colorings will weaken the shell. Investing in a good substrate without hairline cracks will be helpful in making the best pysanka. We’ve only used chicken eggs but you can use any kind.
- Soap – a mild dishwashing detergent will do.
- Engineering pencil – light and thin for precision.
- Candle – not for the wax but for the flame.
- Jars – to mix your dye. Make sure the mouth is large enough for the egg itself and then some.
- Spoons or wire loop – to remove the egg from the jar.
- Tissues – lots and lots of tissues.
- Hair dryer – to melt the wax. Alternative heat sources are candles and the oven.
- Drying rack – we made our own which we’ll show you later.
Other items you may consider using are rubber bands and flexible rulers made of paper or cloth to help you make straight lines in planning your design. You may also choose to have gloves and newspapers handy because of inevitable messes. Finally, cotton balls may be helpful to apply color to a small section without submerging the entire egg.

In the next post of our pysanka series, we will begin our pysanky by preparing the eggs and mixing the dyes! Stay tuned.
Until next time,
Kathy May and Silas
]]>[See image gallery at www.kathymayandsilas.com]
The IKEA Lack table is extremely popular. It is inexpensive, lightweight, and versatile. Its aesthetically simple shape is simultaneously attractive and neutral. Most importantly, it is HOLLOW which makes it a perfect hack for the installation of… well, anything you can imagine! For our first IKEA hack, we modified the Lack table with inset succulent gardens. Here’s what we used in the mod (we’ll mention the materials for the gardens later):
- IKEA Lack side table ($7.99-$9.99 depending on the color)
- Metal ruler (for measuring and as a straight edge)
- Pen
- Utility knife
- Two drawer organizer trays ($1 each at the dollar store)
The Lack tabletop is 55cm square. We planned for two separate insets at a diagonal 2in apart (our ruler is imperial units only). Rather than sitting directly in the tables, our gardens would be contained in these organizer trays that would allow us to remove them for watering and maintenance. The lip of the trays was advantageous, as it could sit upon the tabletop to hide any rough cuts. Here are Silas and his assistant measuring and marking.
[See image gallery at www.kathymayandsilas.com]After carefully preparing our cutting guides, we used our metal ruler as a straight edge and used our utility knife to cut the tabletop. We were patient in making repeated slices, as opposed to a sawing motion, so that our lines would be as clean and smooth as possible. FYI, the tabletop is made of pressed cardboard and is about 5mm thick.
[See image gallery at www.kathymayandsilas.com]Even when all the cuts were made, we found it difficult to remove the cut square because it was so flush! To make it easier, we drilled through the square, then used the hole for leverage to lift it up.
[See image gallery at www.kathymayandsilas.com]As promised, the IKEA Lack table is hollow! You can see that it is supported by innards of mere cardboard in a honeycomb configuration. Honeycombs are a naturally strong and efficient structure that can impressively withstand a great deal of compression. We easily cut and removed the cardboard from the table.
[See image gallery at www.kathymayandsilas.com]Turning our attention to the succulent garden insets: Our gardens would rest in a table without holes for drainage, so we wanted to create an environment that balanced natural drainage and moisture retention. Fortunately, succulents are hardy and forgiving. They do not require much water or soil. We gathered:
- Two organizer trays as above
- River gravel
- Sphagnum moss
- Potting soil
- Aquarium gravel
- An assortment of cacti and succulents
First layer was gravel; second layer was moss; and third layer was soil.
[See image gallery at www.kathymayandsilas.com]We selected a few of our intriguing succulents for display in our Lack gardens. One arrangement had a larger centerpiece with smaller plants surrounding; the other was a more natural arrangement of four plants. (Note: If you can help with identification, we would appreciate your comments below!) Finally, Kathy May dropped our tray gardens into the tabletop. They fit perfectly!
[See image gallery at www.kathymayandsilas.com]For top dressing, we used a medium-sized aquarium gravel. The greens of the succulents would be a visual pop in the clean, white background.
[See image gallery at www.kathymayandsilas.com]We threw together a couple of terrariums inspired from some we had seen at Mahoney’s Garden Center to sit on the opposite diagonals from the inset gardens. We used glass candle bowls that we found at the dollar store. Here is our final product!
[See image gallery at www.kathymayandsilas.com] [See image gallery at www.kathymayandsilas.com]The best thing about using the organizer trays is that we can change our minds! We can mix, match, and exchange the contents of the insets. We could do other types of sunken gardens like herbs or flowers (maybe with a built-in drainage system on the underside of the table). We could even inset decorative elements, like a miniature Zen garden.
[See image gallery at www.kathymayandsilas.com]Thanks so much for hearing about our DIY project! We have other IKEA Lack tables and we look forward to modifying – stay tuned to see what we do next. Do you have any ideas for future IKEA hacks we should try? Please share your thoughts with us in the comments below!
Until next time,
Kathy May and Silas
The Eastern European tradition of creating pysanky (singular pysanka) is generations old with historical and religious undertones. Amazingly, these impressively intricate and magnificently ornate pieces of folk art are created by dyeing the egg, not by painting. Obviously, pysanky takes your typical childhood Easter egg dyeing session to the next level… This Easter season, we made our own versions with our friends Anjie and Lily!
Pysanky are created using a wax-resist method. Essentially, eggs are sequentially dyed in progressively deepening hues. Between each dye, a design of wax is applied to retain that particular color and prevent it from being removed by the next dye. At the end, the wax is melted to reveal the vivid colors of the previous dyes. The project requires a good deal of planning, precision, and patience but the final product is extraordinary.
Additionally, the project requires a number of specialized supplies, which we gathered from an authentic Ukrainian shop here in New York City (Arka on 2nd St at 1st Ave), as well as an assortment of household items. Once we prepared everything we needed, we proceeded to experiment with pysanky with Anjie and Lily. Here are our buddies hard at work! Anjie made a beautiful abstract geometric and floral pysanka. Lily made an innovative Star Wars-themed Boba Fett pysanka.

We’ll post a detailed “how-to” in our blog in the near future which will elaborate upon the tools and procedure of pysanky but, in the meantime, this is an overview of what we did:
- Empty and wash egg
- Plan and draw design
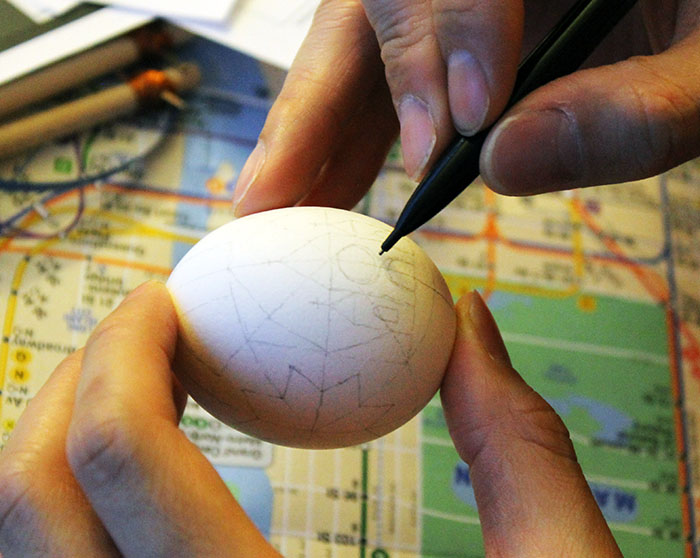
- Heat kistka over candle
- Plug hole in egg
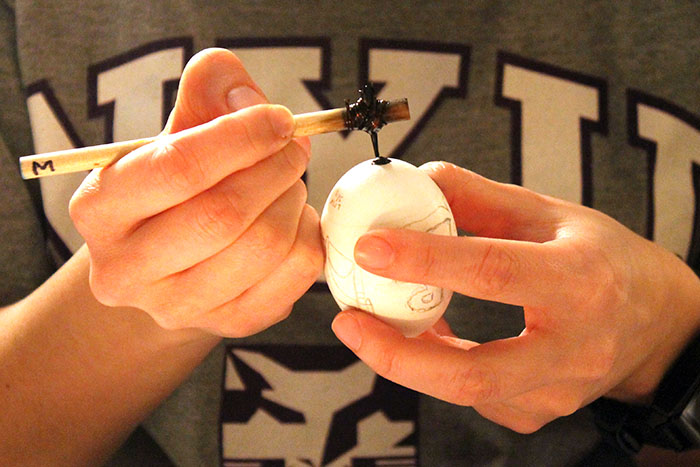
- Apply design of wax to retain first color
- Dye egg with second color
- Successively dye and apply wax in progressively darkening colors

- Heat egg
- Remove melted wax
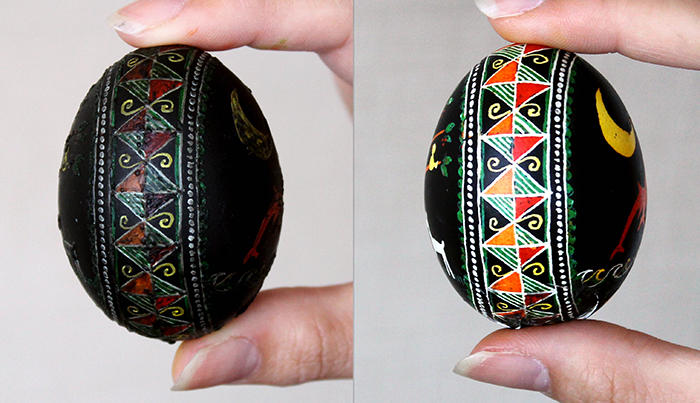
- Varnish egg
We had so much fun! Every person designed their own egg, and we used a combination of traditional pysanky motifs and modern-day imagery. Every person also planned their own sequence of dyes, and the results were excellent. The most exciting part of the entire process is melting the beeswax. Prior to this step, the egg looks particularly unpleasant because of ugly blobs of wax – the designs and patterns are not even clear. When the wax is melted, it easily wipes away, revealing colors much more vivid than expected.
Below, view a gallery of our beginner pysanky creations! We were very satisfied with the final results and this is a craft that we will definitely continue – whether or not it is Easter! Stay tuned for more details on our “How-To” of pysanky, and watch our creations progress at we get more practice…
Update: Click here to see “Part 2 – Materials list for making Ukrainian Easter eggs” in which we go over the tools and materials needed for this traditional craft.
Until next time,
Kathy May and Silas

