
VISIT ALL THE POSTS IN OUR 3D ORIGAMI HOW-TO SERIES!
3D Origami: Introduction
3D Origami: Part 1 – Fold the Component Pieces
3D Origami: Part 2 – Make a Ring Base
3D Origami: Part 3 – Coming Soon!
3D ORIGAMI: PART 1 – FOLD THE COMPONENT PIECES
My initial familiarity with origami was a single paper square folded into typical figures such as cranes, fortune tellers, and jumping frogs. In actuality, origami is a diverse art form and there are many types. For example, 3D origami, also known as modular or unit origami, uses identical component folded papers that are assembled into a more complex structure.
My mother learned and practiced the techniques of 3D origami and became quite a skilled artist. In turn, she introduced and taught me her craft. Please click here to see more of my mom’s 3D origami creations.
In this post, I’ll describe how to make the component pieces for 3D origami. In future posts, I’ll describe how to assemble these component pieces into more complex creations!
- Use recycled paper. As in the majority of her projects, my mom made a conscious effort to use only recycled materials. She used the backs of our old school notes, junk mail envelopes, used church programs, etc. I highly encourage you to be as environmentally aware and to do the same!
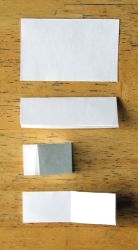
- Fold your paper. If you are using a standard 8-1/2’’ x 11’’ sheet, fold the sheet in half lengthwise 2x (making 4 rectangles along the top) and in half widthwise 3x (making 8 rectangles along the side). One sheet of paper makes 32 component rectangles. You can extrapolate if using recycled scrap paper that is not whole!
- Cut rectangles. Cut along the folds to make 32 rectangles. Each will be sized 1-3/8’’ x 2-1/8’’ – but no need to be absolutely perfect here!
- Make your component piece.
- First, fold rectangle lengthwise. Then, fold widthwise. Unfold the widthwise fold, leaving a center crease.
- With folded edge towards the top, fold one half of the rectangle diagonally downwards to meet the center crease. Repeat with the other half of the rectangle.
- Flip the folded unit over so that you see a triangle on top, with two rectangular flaps below.

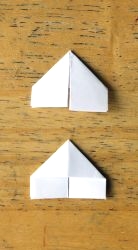
- Fold the outer corner of one flap upwards to meet the bottom of the triangle. Repeat with the outer corner of the other flap
- Fold one flap upwards along the bottom of the top triangle. Repeat with the other flap.
- Fold the triangle in half so that the flaps are on the inside.


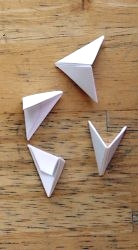
5. Congratulations! This is your component piece!
Believe it or not, folding these component pieces is the hardest part of 3D origami. You will need a large number of component pieces (on the order of hundreds) in order to proceed to the fun, exciting, creative part of this project – the assembly! Hurry up and get moving on folding your component pieces so that we can assemble our 3D origami together! I look forward to seeing you again soon. Happy folding!
Until next time,
Kathy May
VISIT ALL THE POSTS IN OUR 3D ORIGAMI HOW-TO SERIES!
3D Origami: Introduction
3D Origami: Part 1 – Fold the Component Pieces
3D Origami: Part 2 – Make a Ring Base
3D Origami: Part 3 – Coming Soon!


