Mothers hailing from different cultures on every continent have been “wearing” babies upon their own bodies for centuries. Traditionally, baby-wearing is a convenient and pragmatic method to keep track of little ones, while continuing activities of daily life and maintaining the intimacy of mother and child.

Nowadays in North America, baby-carrying cloths are trendy accessories that are marketed under brands like Moby Wrap, Boba Wrap, and Baby K’Tan. But why limit baby-wearing slings, wraps, and carriers to human babies? We decided to make our own wrap… for our pup Mimi!

The idea actually began during our hikes. Mimi is thrilled to scramble up rocks and down paths but, as every one of our human strides is ten of her Maltese steps (times four paws), she tuckers out! We made our own wrap, so that we can carry Mimi during strenuous portions of the trek. The wrap started out as a silly but actually has turned into a very pragmatic piece of equipment! Here is our incredibly simple and quick project – you can make one too!
1. Select 2.5y (90”) of cloth. Our choice was a whimsical folk pattern of quirky birds and playful flowers. This is a 100% cotton fabric that is strong enough to support Mimi’s weight. Ffun fact: Her weight is less than that of most newborns! This fabric also has just a little bit of elasticity for our comfort and for hers. Finally, it is conveniently machine-washable.

2. Cut the cloth length-wise. Most bolts of fabric are either 45” or 60”. If your original bolt is 45” in width, then halve the fabric lengthwise to make two rectangles sized 22.5”x90”; if your bolt is 60” in width, then halve it to make two rectangles sized 30”x90”.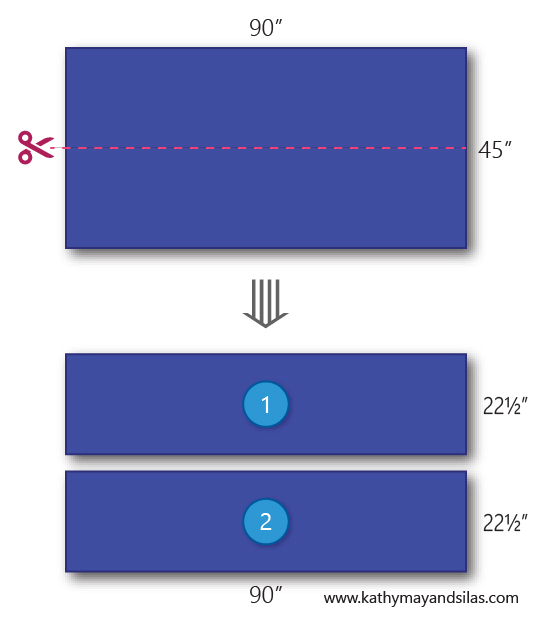
3. Fold and iron the edges of both long sides and one short side of each cloth. This is to prepare the hem of your cloth. Fold the edge of the cloth by less than a centimeter then iron flat. Then, re-fold the edge by less than a centimeter again, and then iron flat.

4. Pin the three folded edges on each piece of cloth and then sew them. Pin the edges that you have ironed flat, so that you may easily sew them. This is the final part of hemming your cloth. You can do this by hand or with a sewing machine. We used the latter, given to us by Kathy May’s mom. We opted for a zig-zag stitch rather than a straight stitch so that it could stretch with the fabric!

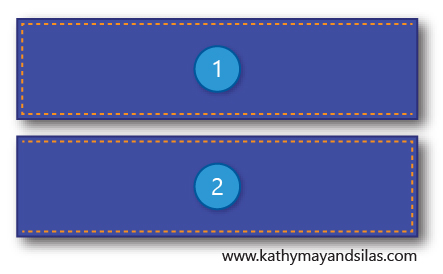
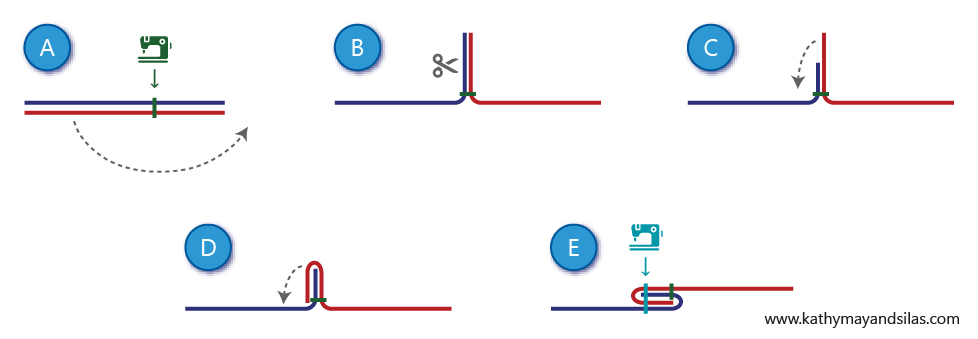
5. Join your cloths by creating a flat-felled seam between the two short un-hemmed sides. A flat-felled seam is a strong and durable seam, ideal for our wrap which would endure the stress of supporting a dog and frequent machine washes. It also encases both raw edges for a clean finish. Finally, it is completely flat for our comfort and Mimi’s.
Here is a cross-section schematic of what the flat-felled seam is:
This short and easy-to-follow video taught us how to create this professional-looking seam.
6. Wrap your dog! There are a number of ways to wrap your dog (or baby) on your chest or on your back, but we have found the easiest is the method recommended by the popular Moby Wrap and Boba Wrap. See our quick how-to video, featuring the one-and-only Mimi! Music credit: “The Printed Word” by David Hilowitz.
As you can see, the doggie wrap is essentially a very long piece of cloth with finished edges! We spent just a few dollars on this project with the purchase of the fabric, rather than spending $50+ on a designer baby wrap! Our doggie wrap can be folded and stashed into our bag, or tied around our waist, only to be whipped out when Mimi starts to tire. From the first use, she loves the doggie wrap! As you can see from the video, she jumps up happily to be placed into the wrap and enjoys being carried. Once she’s inside, she relaxes and enjoys the scenery. We hope that you make one of these adorable and pragmatic wraps for your pup (or maybe your baby)! Let us know what you think in the comments below!
Until next time,
Kathy May and Silas

]]>
Mimi is a happy, peppy pup and the theme we chose was equally fun and playful. For the basics of the main design elements, we used pre-made vector files of a simple house from clker and anthromorphized flowers from freepik. There are innumerable free vectors available online, and a large advantage of vector art is that they can be imported into Adobe Illustrator to save a great deal of time in the design stage.

That being said, there was still a great deal of legwork to be done to modify the vector art into Mimi’s design (don’t worry, we won’t go into the nitty gritty in this post). In addition to tweaking the vector art, we also added other details including Mimi’s name to customize the design. After finalizing the design, we prepared the Illustrator file for the laser cutter. The instructions for the laser cutter – engrave, line, cut, etc. – are communicated via color. In this image, for example, cyan commands “vector cut”; navy blue commands “vector line”; and black, royal blue, and red command variable depths of “engrave.”
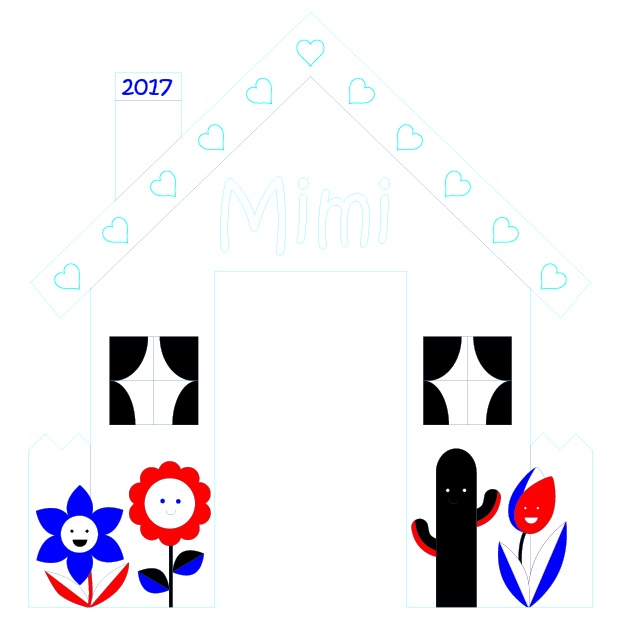
Next, we were off to Boston Makers, the non-profit makerspace in Jamaica Plains where we volunteer! Its laser cutter, 3D printers, and more are open to the community – let us know if you’re interested in dropping by! We imported our Adobe Illustrator file into Corel DRAW, which is the program the laser cutter utilizes to translate color (as above) to command. We selected 1/4” birch plywood for Mimi’s door. Here are a couple of 30-second videos of the laser cutter at work:
After cutting and engraving, we sanded the door to remove smoke stains from the laser cutting process. To prepare it for the outdoors, we sprayed it with two coats of Thompson’s WaterSeal Waterproofing Wood Protector. While at Boston Makers, we devised a way to mount Mimi’s door onto the balcony. Our solution was to design and 3D-print two C-hooks that would clamp the door to the bottom horizontal rung of the balcony. Here is a clip of the LulzBot as it is 3D-printing our C-hooks:
Back at home, we cut a Mimi-sized peephole from the wind barrier panel and slid the top of the house under the barrier’s fastener. The bottom of the house is held in place with the 3D-printed C-hooks. Here’s the final construction!
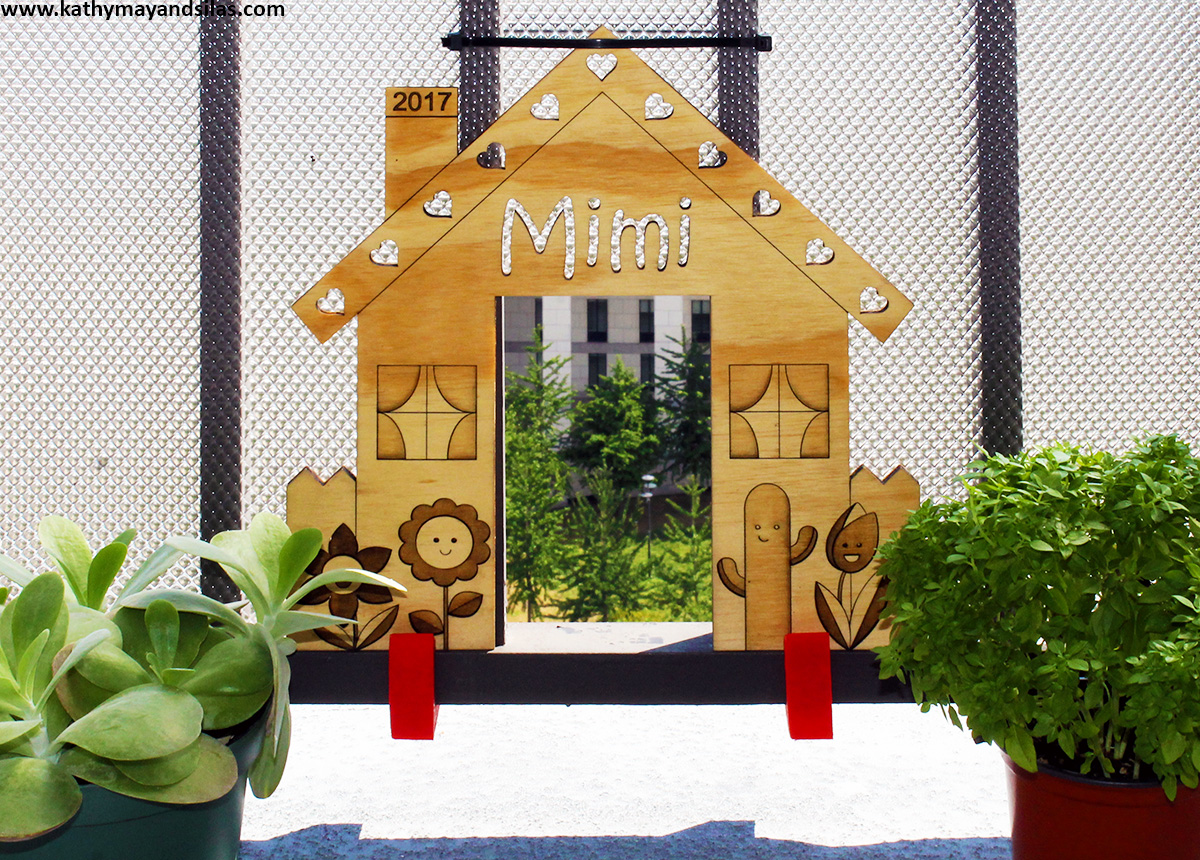
Mimi loves her new doggie door! She is again able to enjoy her view of the city below and to get a nice whiff of fresh air at her leisure! Click on the gallery images below to see some snapshots of her enjoying the balcony. By the way, we loved her door so much that we laser-cut a second copy to paint and display indoors. A picture of that is included in the gallery too!
Until next time,
Kathy May and Silas
Paper Flowers: Introduction
Paper Flowers: Part 1 – Make the Petals
Paper Flowers: Part 2 – Coming soon….!
PAPER FLOWERS: PART 1 – MAKE THE PETALS
Years ago, my mom taught me how to make these paper flowers (click here to see some examples), and they have become one of my most favorite projects. My mom herself learned and perfected the technique so that she could make a bouquet for me and a boutonniere for Silas. Now it is my pleasure to share this paper-craft with you. My mom and I developed a number of variations for the paper flowers, which I will share in future posts. In this post, we’ll begin making a basic petal design. In the next post, we’ll assemble the petals into a complete flower.
Step #1: Gather your materials.
- Paper – The weight of the paper affects the ease of the project (the lighter the easier), but you can use virtually any kind of regular paper. Naturally aged pages have a great deal of character. Other ideas are sheet music and wrapping paper.
- Floral stem wire – Choose a 16-18 gauge wire. A higher gauge will be too weak to support the weight of your paper flower.
- White glue – Any white glue will do.
- Clips – You can use anything you have on hand: clothespins, bobby pins, binder clips, etc.

Step #2: Cut a square of paper. A typical paperback novel is the perfect size. If you cut a square out of a page, save the rest of the page for Part 2 of this project.

Step #3: Fold the square in half diagonally. Place the open side towards the top. Your folded paper should look like a triangle with the longest side on the bottom.

Step #4: Fold the right corner of the triangle to the center corner.

Repeat for the other side. Then place the open side towards the top. Your folded paper should now look like two triangles with their long sides touching, and the two triangles overlying a square.

Step #5: Fold down the long side of the right triangle to meet the short side of the triangle.

Repeat for the other side. Your folded paper should now look like a kite with two triangles emerging from the sides.

Step #6: Trim both side triangles to make them flush with the square underneath. Your folded paper should now look like a square that is made of a kite and two triangles. Position the triangles towards the bottom and the kite upright.

Step #7: Place glue along the bottom two sides of the square. Then lift the triangles and place glue along the bottom two sides of the square under the flaps of the triangle. Place the flaps of the triangles back down.

Step #8: Fold but do not crease the square vertically along the diagonal of the square. Make sure that you bring the faces of the two triangles together. Once again, make sure you do not crease along the fold.

Step #9: Secure the glued edges with a clip. Wait until the glue is dried, then remove the clip. Depending on the weight and quality of your paper, this should take just a few minutes.

Congratulations: This is one petal! Repeat the above process so that you have around five to seven petals. Then, wait for Part 2 of this series, when we will finish our paper flower!
Until next time,
Kathy May and Silas
VISIT ALL THE POSTS IN OUR “PAPER FLOWERS” HOW-TO SERIES!
Paper Flowers: Introduction
Paper Flowers: Part 1 – Make the Petals
Paper Flowers: Part 2 – Coming soon….!
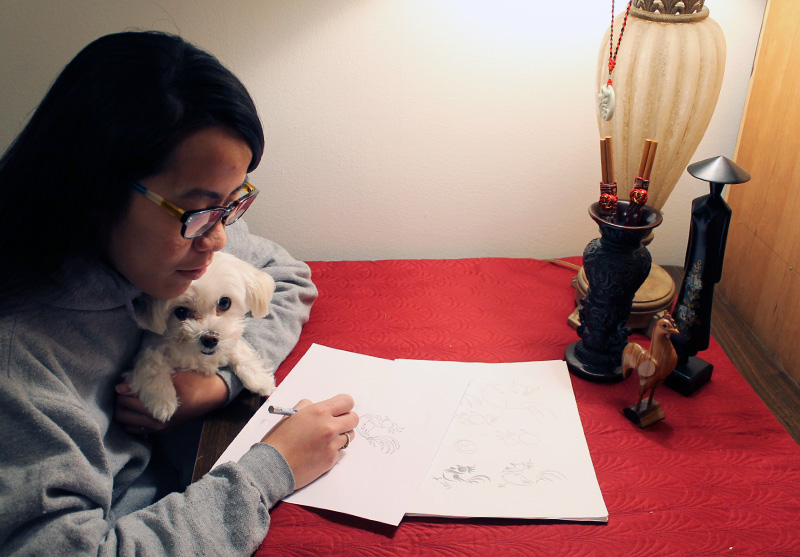
To start our project, Kathy Mây sketched the design. We decided to go with a clean image, one that was bold enough to reflect the confidence and showmanship that is typical of the Rooster.
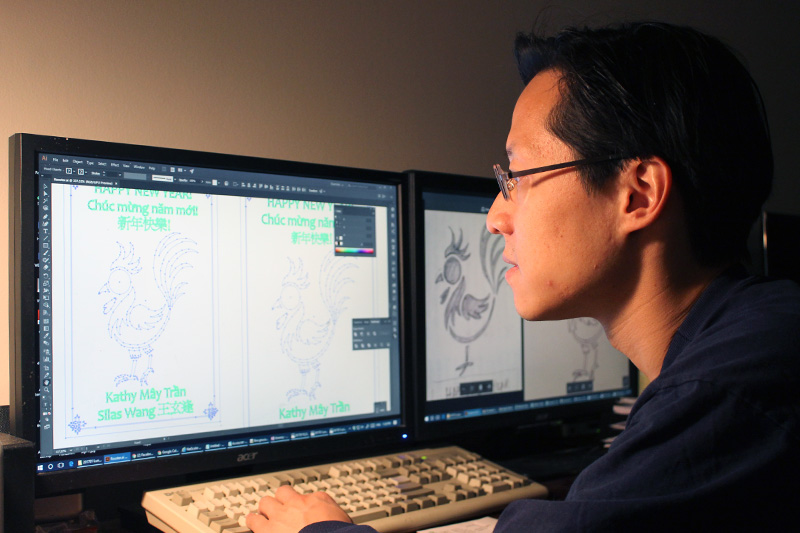
Silas scanned the sketch into the computer. He used Illustrator to trace it and then clean it up into a final vector drawing that can be understood by the laser cutter. He then added trilingual text and a simple East-Southeast-Asian inspired design that did not overwhelm the Rooster, who thrives upon being the center of attention. In the Illustrator file, different colors corresponding to different laser settings.
We used the laser cutter at Boston Makers to complete our project! Based in Jamaica Plain, Boston Makers is a nonprofit organization that provides a collaborative workspace to encourage creativity and engage the maker spirit in the community – young and old, gals and guys, novices and experienced makers of all kinds! We have been volunteering there as hosts to staff the space and help people use the equipment to create their projects. If you are interested in learning or pursuing 3D printing, soldering and electronics, textiles and fabric arts, woodworking, arts and crafts, or any other kind of project, please let us know in the comments below!
We decided to use regular red posterboard, knowing that only the outside paper was dyed red; the internal layers are uncolored paper that would show up as a light brown. On the laser cutter, we used both the engraving and cutting functions. Click on the short video below to see the process in action:
Each rooster card was 65 x 95 mm, the perfect size to fit in a red envelope.

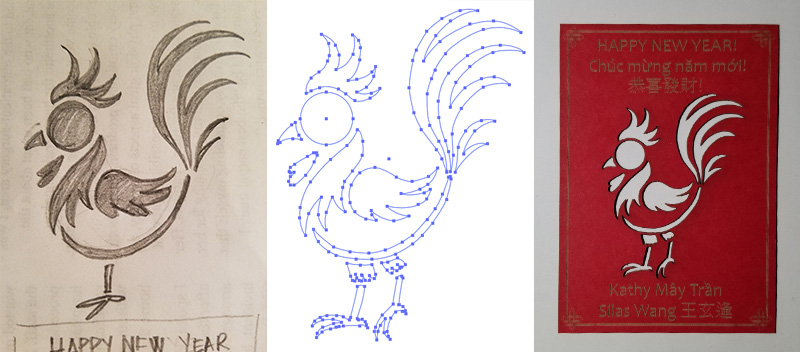
Here is the card evolving through its stages of creation, from sketch to vector art, to finished product!
In addition to the Rooster card, each red envelope also contained our annual picture – in color coordination, of course – to commemorate the Lunar New Year.
Happy Lunar New Year! This year we wish you peace, happiness, good health, and anything your heart desires!
Chúc mừng năm mới! Năm này mình chúc bạn bình an, hạnh phúc, sức khỏe, và vạn sự như ý!
新年快樂! 恭禧發財!
Until next time,
Kathy Mây and Silas
3D Origami: Introduction
3D Origami: Part 1 – Fold the Component Pieces
3D Origami: Part 2 – Make a Ring Base
3D Origami: Part 3 – Coming Soon!
3D ORIGAMI: PART 2 – CREATE THE RING BASE
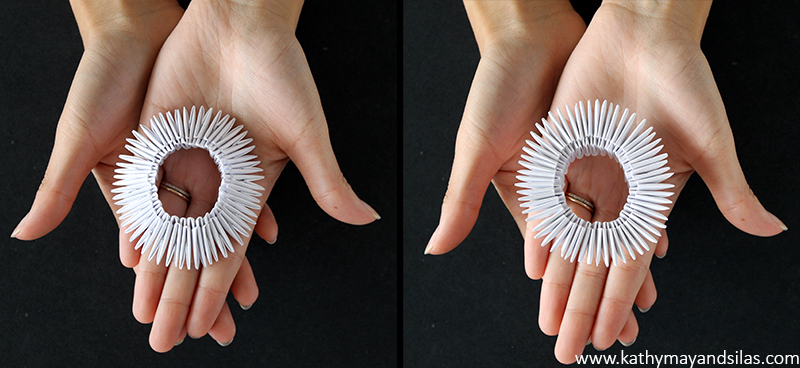
Now that you have made a large pile of triangular component pieces (see “Part 1: Fold the Component Pieces“), we can start to build a ring base! A ring base is a versatile foundation for any 3D origami creation. On the left is a ring base alone; on the right is a ring base as the foundation of a 3D origami swan.
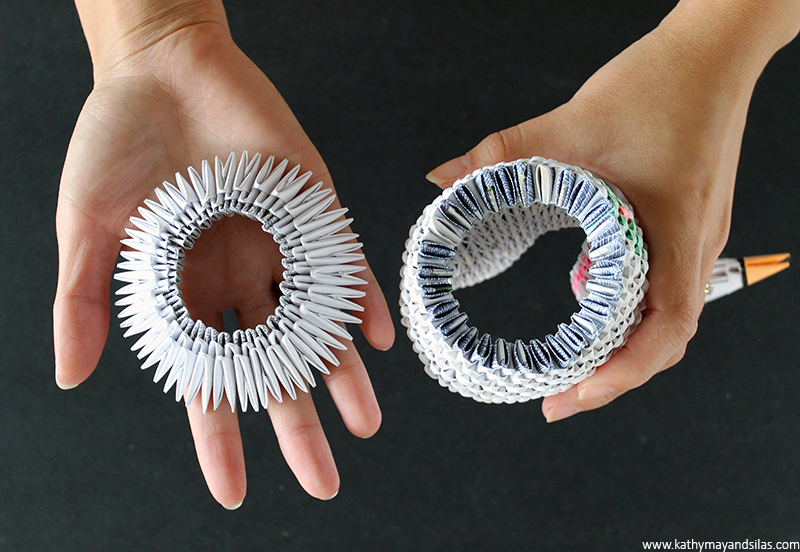
In this tutorial, we will make a ring base of 30 component pieces. Please note that you may alter the number of component pieces in your ring base to make larger or smaller 3D origami creations. Shall we begin?
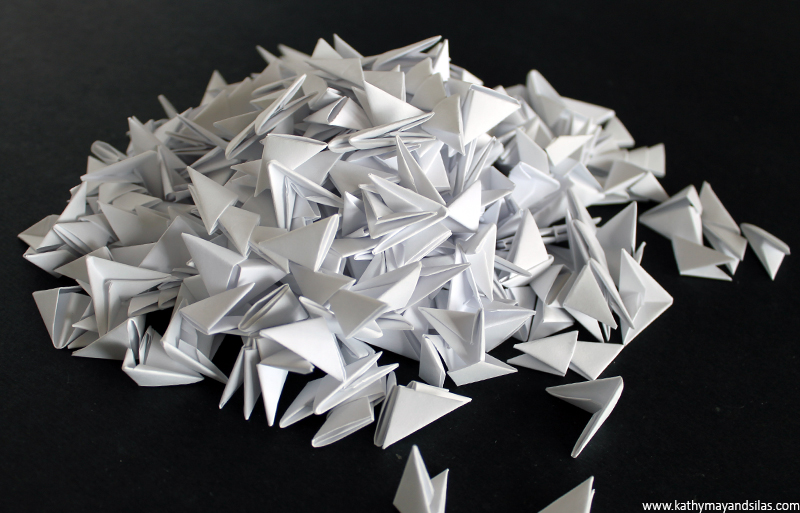
1. First, make sure you have a sufficient number of component pieces. For a ring base of 30, you will require 60 component pieces for the base itself. Of course, you should make extra for the rest of your origami sculpture.
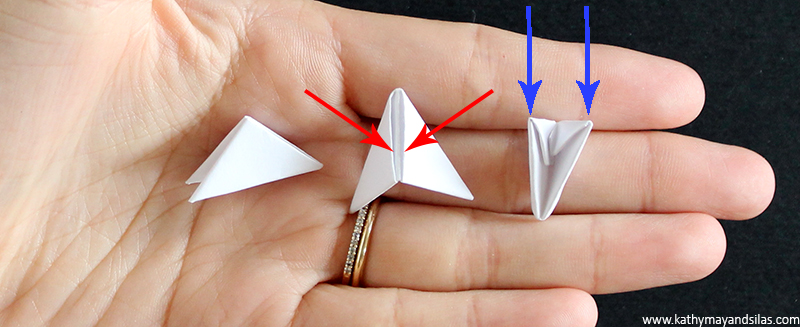
2. Note that each component piece is a right triangle. One leg of the right triangle has two “pockets” (red arrows) while the other leg has two “wings” (blue arrows).
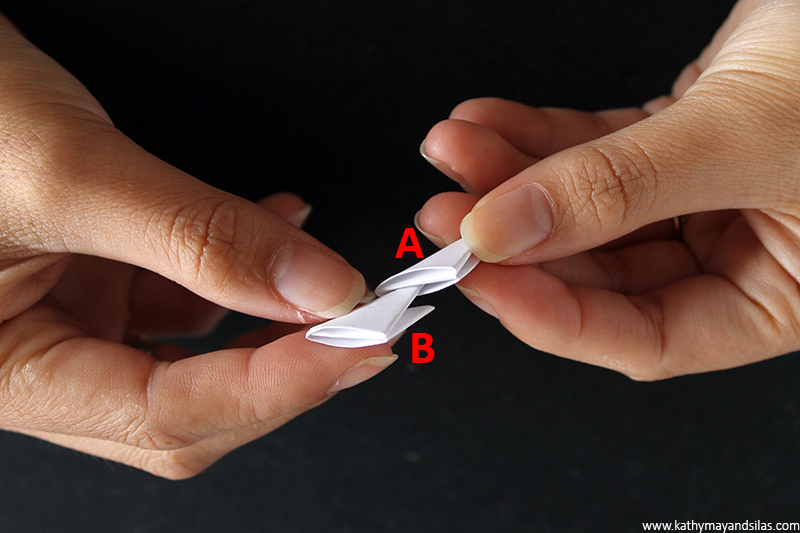
3. Insert the left wing of one component piece (B) into the right pocket of another component piece (A). Make sure that the component pieces are facing the same direction (i.e., that the right triangle component pieces are parallel).
4. Then insert the right wing of a new component piece (C) into the other pocket (A).
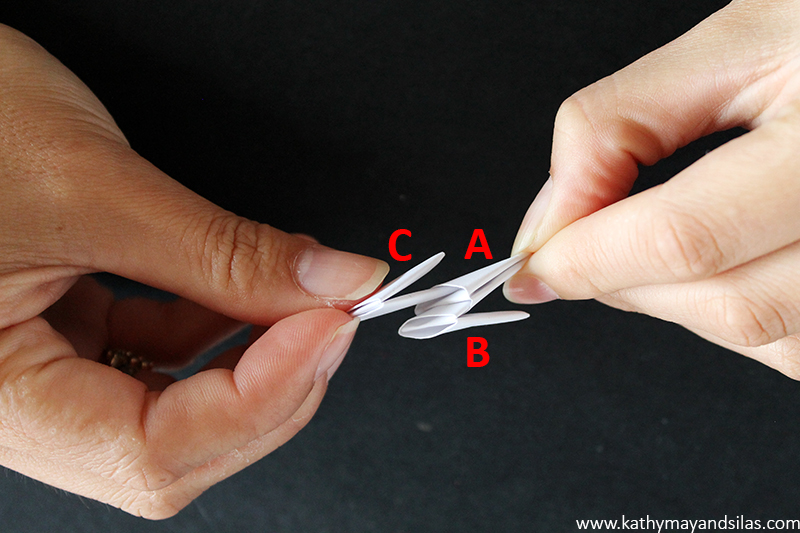
Here’s what your 3-component-piece unit should look like from the front and back, front and side.
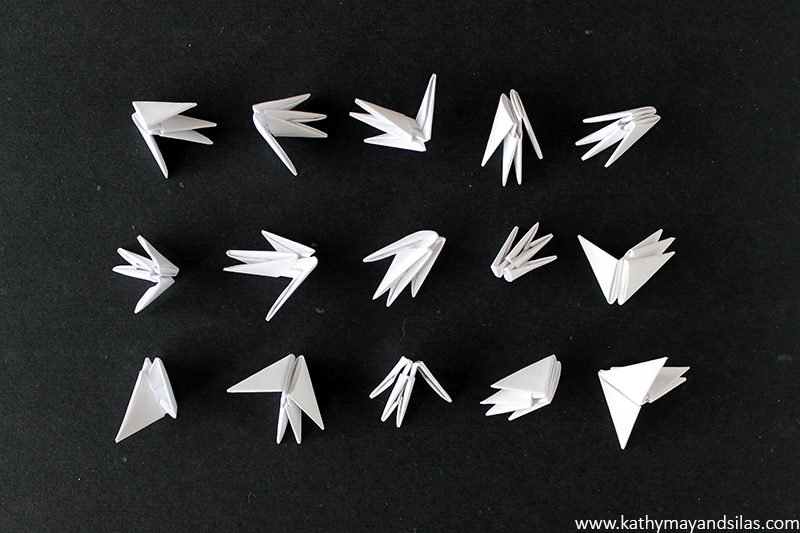
5. Repeat Steps 3 and 4 with new component pieces until you have 15 sets of 3-component-piece units.
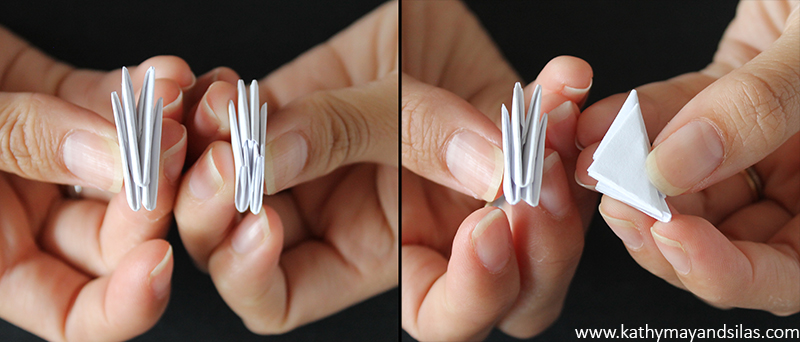
6. Hold 2 sets of your 3-component-piece units (E & F) side-by-side. Take a new component piece (D) to join these 2 sets together. The right-most wing of E should go into the left pocket of D; the left-most wing of F should go into the right pocket of D.
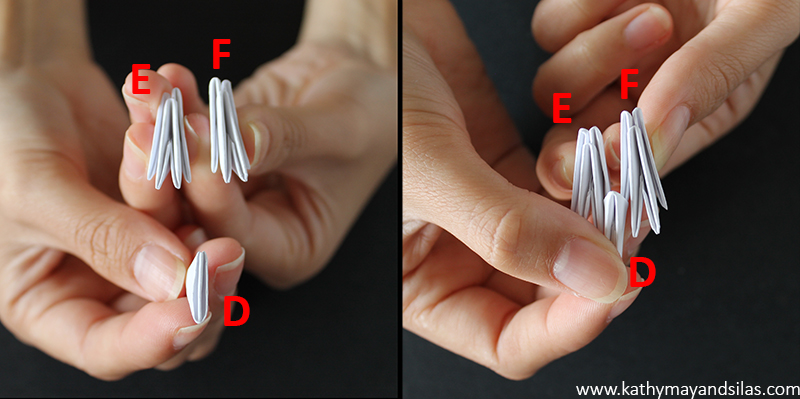
Now you have created a 7-component-piece unit. Here’s what it should look like from the front and back.
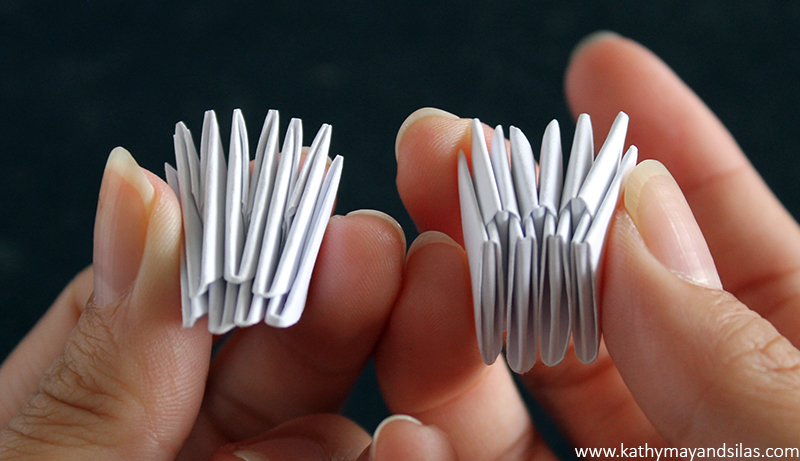
7. Repeat Step 5 until you have 7 sets of 7-component-piece units. Since we have an odd number, the 8th set will be a 3-component-piece-unit, which I’m holding in the picture.
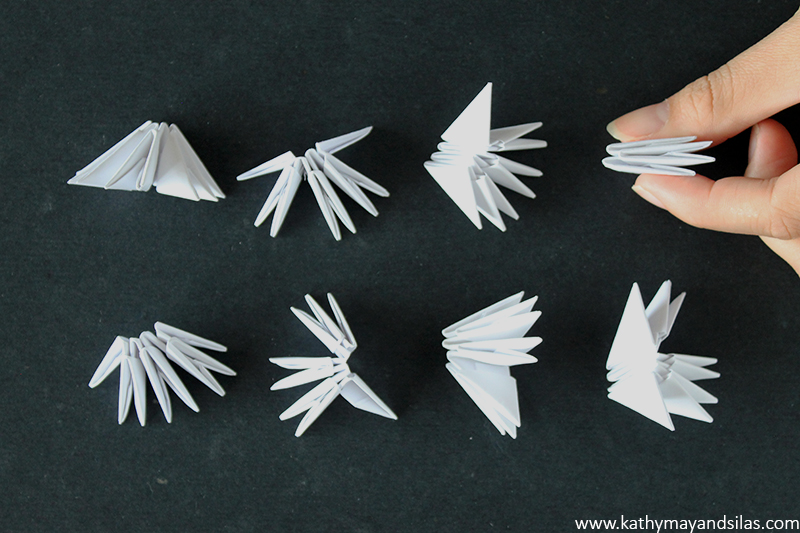
8. Hold 2 sets of 7-component-piece units side-by-side. Take a new single component piece to join these 2 units together. This is analagous to the previous step – you’ve got the hang of it! We are assembling these in smaller units because assembling a long chain becomes unwieldy!

9. Continue joining sets until you’ve made a semicircle. Make this a complete circle by using your final single component piece to join together the wings on either side of the semicircle.
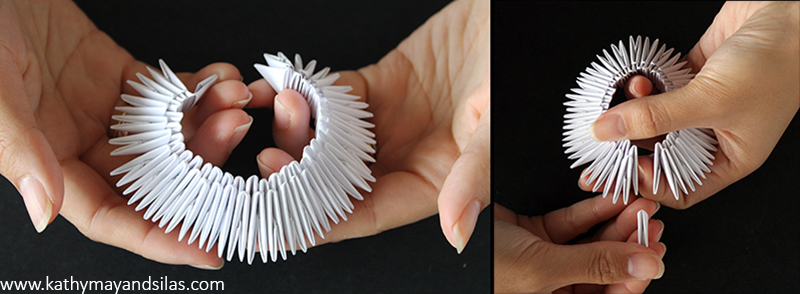
10. There you have it – you’re done! You’ve made a ring base of 30. It should feel sturdy at this point, not requiring glue. You can tighten it (but not too much, please) by pushing the outer layer into the inner layer of component pieces. As we add more layers later, the structure will be further strengthened. Here is a view of the top and bottom of your completed ring base.
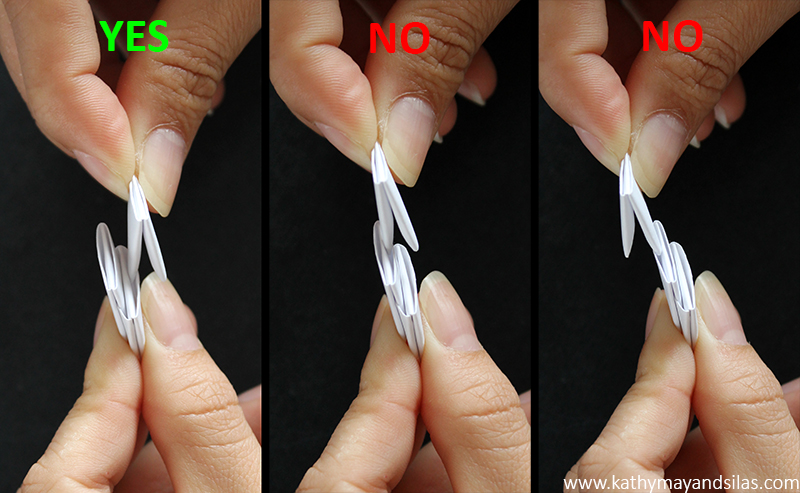
The entire process of modular origami is very simple once you have learned the basics. Here are a couple of images to help with troubleshooting. If you have any questions, please leave me a comment below and I’ll be happy to help!
Troubleshooting #1: Make sure that the correct wing of your component piece goes into the correct pocket of another component piece.
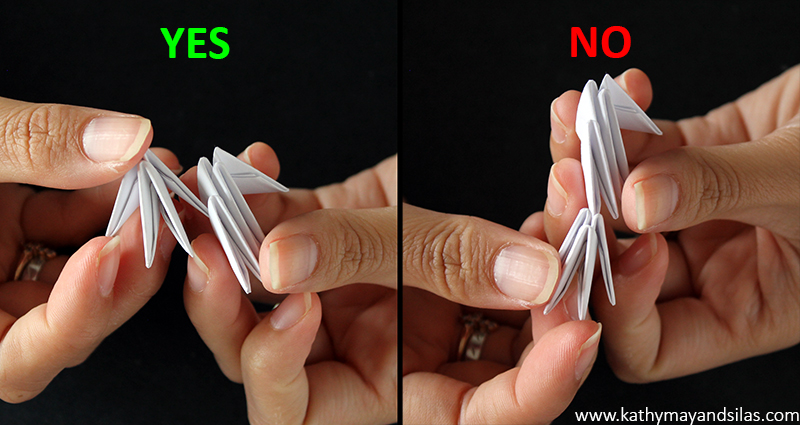
Troubleshooting #2: Make sure that all of your component pieces are facing the same direction (i.e., all hypotenuses of all component pieces should be parallel).
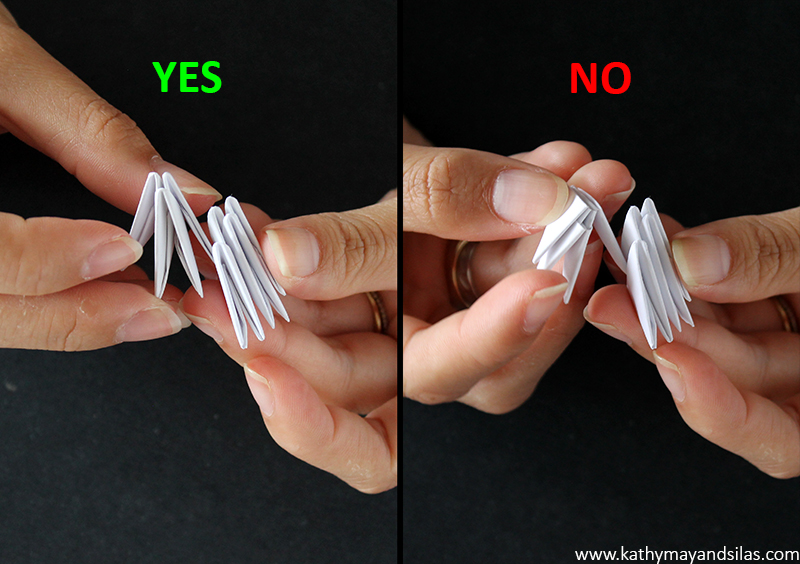
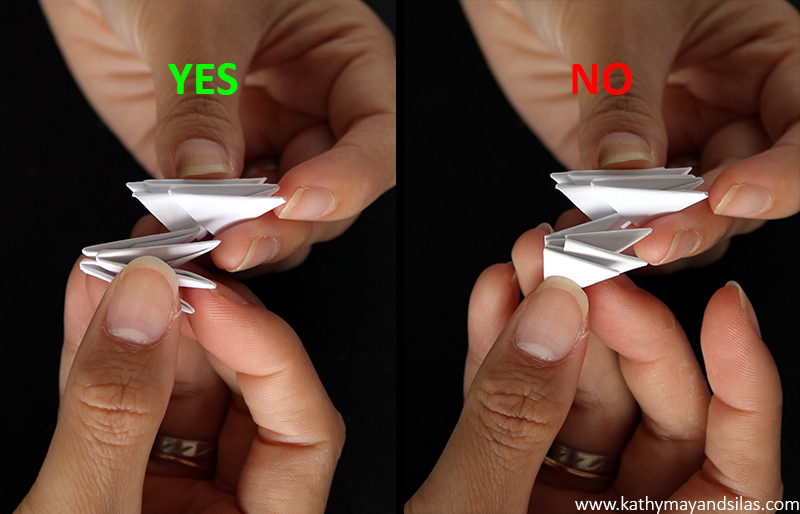
Congratulations on making your 3D origami ring base. Hopefully you made many more than 60 component pieces so that we can go onto Part 3. Stay tuned – happy folding!
Until next time,
Kathy May and Silas
VISIT ALL THE POSTS IN OUR 3D ORIGAMI HOW-TO SERIES!
3D Origami: Introduction
3D Origami: Part 1 – Fold the Component Pieces
3D Origami: Part 2 – Make a Ring Base
3D Origami: Part 3 – Coming Soon!
]]>In preparation of making our pysanky, we required a number of specialized equipment. Even though pysanka-making kits are available, we opted to pick and choose our supplies. We bought them at an authentic Ukrainian shop in Lower East Side, Manhattan (Arka on 2nd St at 1st Ave). Here’s what we got:
- Egg blower – optional! As children, Kathy May’s mom taught her and her brother to blow eggs the old-fashioned way. Having a tool to blow eggs, however, makes the process easier and faster. There are a few types of egg blowers. Some, like our S-shaped blower, require lung power to blowing out the egg. Others utilize an accordion or ballon pump to remove contents.
- Kistka – the stylus that will dispense the wax. Available are: traditional (wooden handle with copper funnel and wire), Delrin (thermoplastic with brass funnel), and even electric kistkas. They are available in fine, medium, or heavy funnel sizes. Fine is a necessity for detailed designs; medium is most versatile; and heavy is helpful for filling in larger areas. Each of these were about $2.

Kistkas in three sizes: two fine, two medium, and one heavy - Beeswax – much softer than typical candle wax. Natural or black colors are available in small blocks. If the natural-colored beeswax is used, one may use soot from the kistka/candle to darken the wax and allow visibility when it is applied onto the egg. We decided to go the easier way and buy a beeswax with black coloring from the get-go.
- Dyes – not your typical food dye or Easter egg dye. These are acid-based that are distributed as powders in small envelopes. The most basic traditional colors are yellow, red/orange, green, brown and black. Nowadays, they’re available in all colors of the rainbow.
- Varnish – We settled on an oil-based polyurethane from a local hardware store. Polyurethane is easy to find, but the tradeoff is it causes whites to yellow over time. There are a number of alternatives, but make sure to avoid non-clear and water-based options!
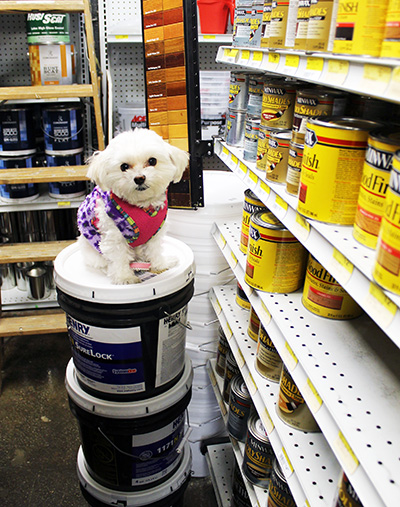
In addition to the more specialized supplies above, you will also require a number of household supplies:
- Egg – with as few defects as possible. As the pysanka dye is acid-based, sequential colorings will weaken the shell. Investing in a good substrate without hairline cracks will be helpful in making the best pysanka. We’ve only used chicken eggs but you can use any kind.
- Soap – a mild dishwashing detergent will do.
- Engineering pencil – light and thin for precision.
- Candle – not for the wax but for the flame.
- Jars – to mix your dye. Make sure the mouth is large enough for the egg itself and then some.
- Spoons or wire loop – to remove the egg from the jar.
- Tissues – lots and lots of tissues.
- Hair dryer – to melt the wax. Alternative heat sources are candles and the oven.
- Drying rack – we made our own which we’ll show you later.
Other items you may consider using are rubber bands and flexible rulers made of paper or cloth to help you make straight lines in planning your design. You may also choose to have gloves and newspapers handy because of inevitable messes. Finally, cotton balls may be helpful to apply color to a small section without submerging the entire egg.

In the next post of our pysanka series, we will begin our pysanky by preparing the eggs and mixing the dyes! Stay tuned.
Until next time,
Kathy May and Silas
]]> Last time Silas and I were in San Francisco, we visited the SF Cable Car Museum and learned that the famous SF system is the only one that still operates entirely manually. Three of the 23 original lines established in the late 1800s comprise the current SF system. Other than in SF, we’ve only ridden cable cars in a few other cities including Las Vegas and Toronto. Like the SF cable cars, these run alongside street traffic; however, these are not traditional – they are fully automated, allowed the right of way, and not intended for mass transit (though admittedly even in SF cable cars are more for tourists than commuters nowadays). In general, the popularity of cable cars never became widespread because of the introduction of electric streetcars soonafter. In SF, their persistence and survival may be attributed their mechanism of traction locomotion. Notoriously steep areas of the city were more conducive to cable car than electric streetcar. Now SF cable cars are listed in the National Register of Historic Places.
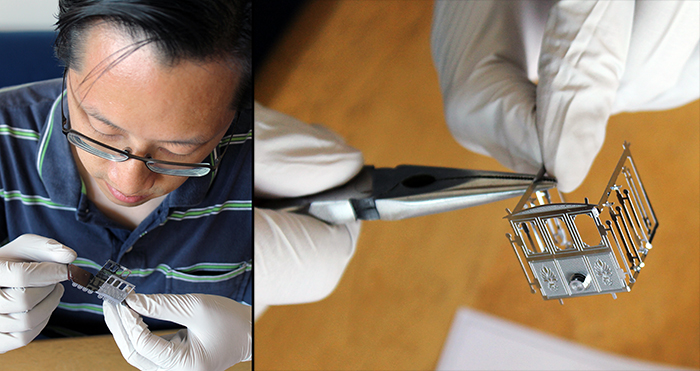
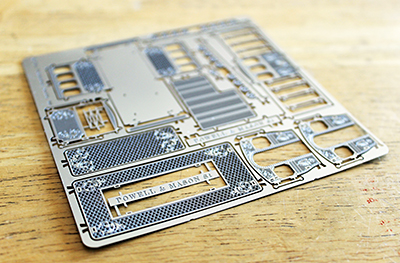 The eleven pieces of the SF cable car model from Lily were contained completely on a single sheet of steel. For assembly, we decided to wear latex gloves to minimize fingerprints, especially on the inside of the cable car which would be inaccessible in the final product. Each component piece of the model was supported at two or three points within the metal sheet. They popped out easily with little effort.
The instructions were entirely pictorial and easy to follow. Some pieces required folding along fine scores in the metal; others required bending. The pieces fit together seamlessly by a simple tab system. If a piece had a tab, the corresponding receiving piece had a slot for the tab. After positioning the pieces together, the tab was then twisted or folded to keep the pieces together. We used our fingers or needle-nosed pliers for assistance.
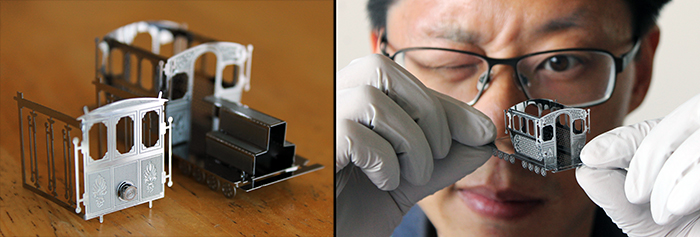
Here is the finished San Francisco cable car! The entire 3D model is approximately 2” x 1” x 1”. You can see the intricacy of the detailing on each piece, thanks to the laser-cutting technique. These details were even more beautiful given the small scale.

Thanks, Lily, for your thoughtful gift and for an afternoon of fun!
Until next time,
Kathy May and Silas
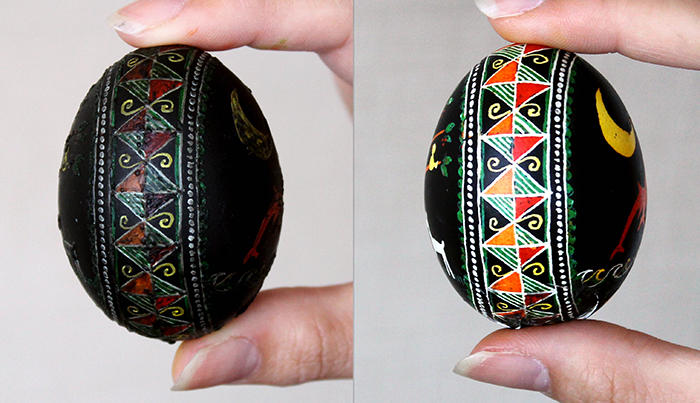
The Eastern European tradition of creating pysanky (singular pysanka) is generations old with historical and religious undertones. Amazingly, these impressively intricate and magnificently ornate pieces of folk art are created by dyeing the egg, not by painting. Obviously, pysanky takes your typical childhood Easter egg dyeing session to the next level… This Easter season, we made our own versions with our friends Anjie and Lily!
Pysanky are created using a wax-resist method. Essentially, eggs are sequentially dyed in progressively deepening hues. Between each dye, a design of wax is applied to retain that particular color and prevent it from being removed by the next dye. At the end, the wax is melted to reveal the vivid colors of the previous dyes. The project requires a good deal of planning, precision, and patience but the final product is extraordinary.
Additionally, the project requires a number of specialized supplies, which we gathered from an authentic Ukrainian shop here in New York City (Arka on 2nd St at 1st Ave), as well as an assortment of household items. Once we prepared everything we needed, we proceeded to experiment with pysanky with Anjie and Lily. Here are our buddies hard at work! Anjie made a beautiful abstract geometric and floral pysanka. Lily made an innovative Star Wars-themed Boba Fett pysanka.
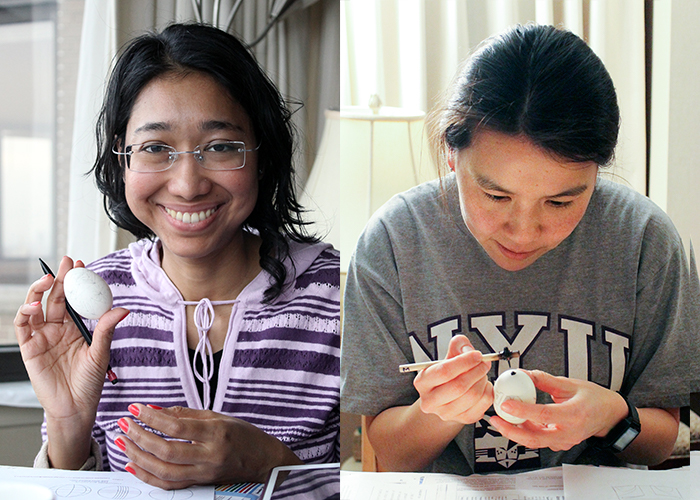
We’ll post a detailed “how-to” in our blog in the near future which will elaborate upon the tools and procedure of pysanky but, in the meantime, this is an overview of what we did:
- Empty and wash egg
- Plan and draw design
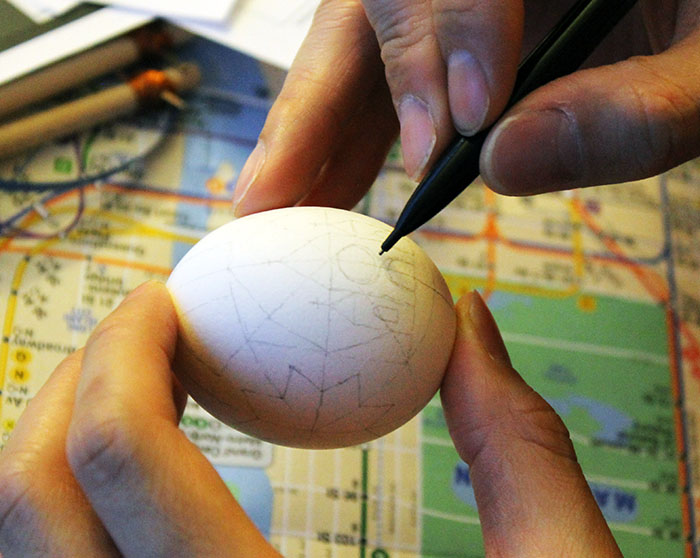
- Heat kistka over candle
- Plug hole in egg
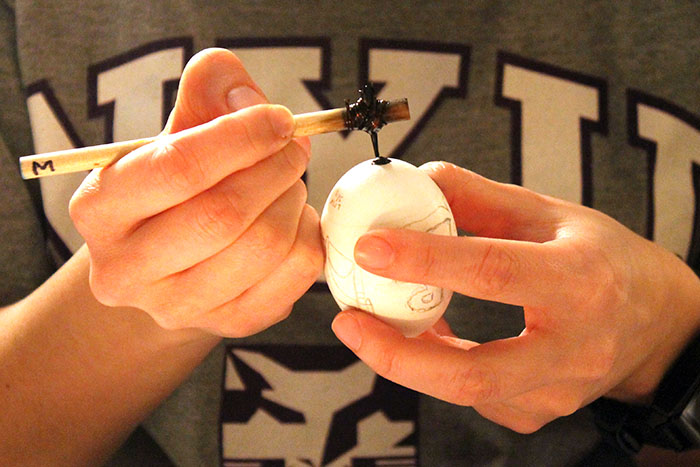
- Apply design of wax to retain first color
- Dye egg with second color
- Successively dye and apply wax in progressively darkening colors

- Heat egg
- Remove melted wax
- Varnish egg
We had so much fun! Every person designed their own egg, and we used a combination of traditional pysanky motifs and modern-day imagery. Every person also planned their own sequence of dyes, and the results were excellent. The most exciting part of the entire process is melting the beeswax. Prior to this step, the egg looks particularly unpleasant because of ugly blobs of wax – the designs and patterns are not even clear. When the wax is melted, it easily wipes away, revealing colors much more vivid than expected.
Below, view a gallery of our beginner pysanky creations! We were very satisfied with the final results and this is a craft that we will definitely continue – whether or not it is Easter! Stay tuned for more details on our “How-To” of pysanky, and watch our creations progress at we get more practice…
Update: Click here to see “Part 2 – Materials list for making Ukrainian Easter eggs” in which we go over the tools and materials needed for this traditional craft.
Until next time,
Kathy May and Silas
I love the look of old paperback book pages. Initially I scoured Goodwill and Salvation Army for literary classics that I’ve read because I liked the idea of eternalizing beautiful and meaningful pieces of writing into my crafts. Upon further thought, I’ve realized that doing so also takes valuable classics out of circulation! Now I leave those alone and just use any old books.
Please try making your own paper flowers in our How-To series, links below. Then, please share your comments and creations in the Comments section below!
VISIT ALL THE POSTS IN OUR “PAPER FLOWERS” HOW-TO SERIES!
Paper Flowers: Introduction
Paper Flowers: Part 1 – Make the Petals
Paper Flowers: Part 2 – Coming soon….!