We are very excited about our latest project which is a practical and eye-pleasing addition to our new apartment. It combines a number of our interests: recycling, gardening, home improvement, and doing it ourselves! It’s moving season and we found a set of discarded IKEA Lack side tables. Here is Mimi modeling one of them. They’re a little scratched but we anticipated some usefulness for our arts and crafts experiments/projects. Sure enough, completely by coincidence, Silas came across a Lifehacker article that served as our inspiration.

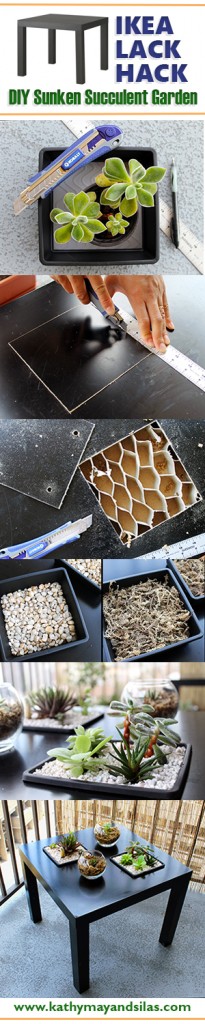
The IKEA Lack table is extremely popular. It is inexpensive, lightweight, and versatile. Its aesthetically simple shape is simultaneously attractive and neutral. Most importantly, it is HOLLOW which makes it a perfect hack for the installation of… well, anything you can imagine! For our first IKEA hack, we modified the Lack table with inset succulent gardens. Here’s what we used in the mod (we’ll mention the materials for the gardens later):
- IKEA Lack side table ($7.99-$9.99 depending on the color)
- Metal ruler (for measuring and as a straight edge)
- Pen
- Utility knife
- Two drawer organizer trays ($1 each at the dollar store)

The Lack tabletop is 55cm square. We planned for two separate insets at a diagonal 2in apart (our ruler is imperial units only). Rather than sitting directly in the tables, our gardens would be contained in these organizer trays that would allow us to remove them for watering and maintenance. The lip of the trays was advantageous, as it could sit upon the tabletop to hide any rough cuts. Here are Silas and his assistant measuring and marking.

After carefully preparing our cutting guides, we used our metal ruler as a straight edge and used our utility knife to cut the tabletop. We were patient in making repeated slices, as opposed to a sawing motion, so that our lines would be as clean and smooth as possible. FYI, the tabletop is made of pressed cardboard and is about 5mm thick.

Even when all the cuts were made, we found it difficult to remove the cut square because it was so flush! To make it easier, we drilled through the square, then used the hole for leverage to lift it up.

As promised, the IKEA Lack table is hollow! You can see that it is supported by innards of mere cardboard in a honeycomb configuration. Honeycombs are a naturally strong and efficient structure that can impressively withstand a great deal of compression. We easily cut and removed the cardboard from the table.

Turning our attention to the succulent garden insets: Our gardens would rest in a table without holes for drainage, so we wanted to create an environment that balanced natural drainage and moisture retention. Fortunately, succulents are hardy and forgiving. They do not require much water or soil. We gathered:
- Two organizer trays as above
- River gravel
- Sphagnum moss
- Potting soil
- Aquarium gravel
- An assortment of cacti and succulents

First layer was gravel; second layer was moss; and third layer was soil.

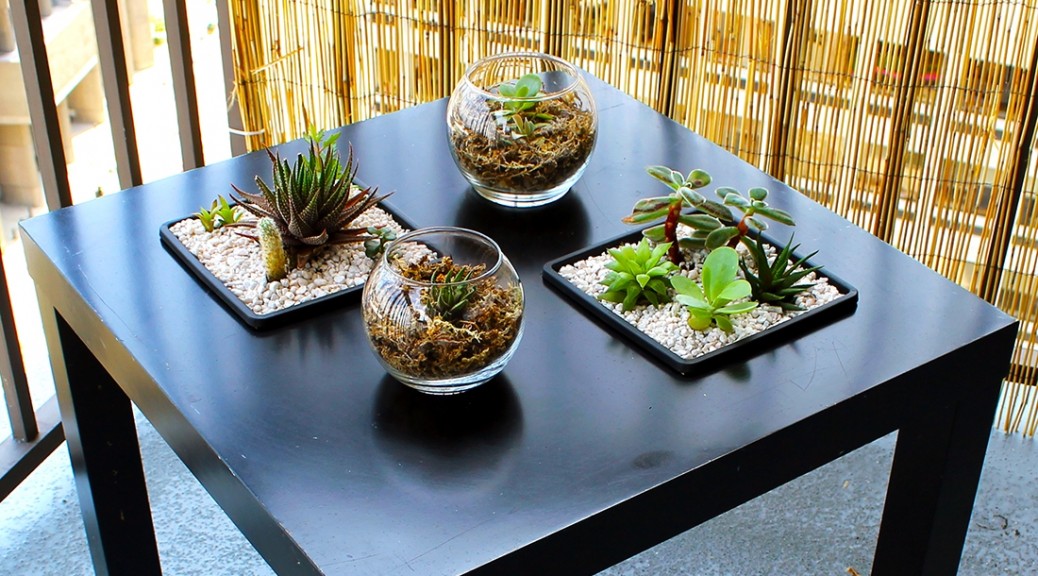
We selected a few of our intriguing succulents for display in our Lack gardens. One arrangement had a larger centerpiece with smaller plants surrounding; the other was a more natural arrangement of four plants. (Note: If you can help with identification, we would appreciate your comments below!) Finally, Kathy May dropped our tray gardens into the tabletop. They fit perfectly!

For top dressing, we used a medium-sized aquarium gravel. The greens of the succulents would be a visual pop in the clean, white background.

We threw together a couple of terrariums inspired from some we had seen at Mahoney’s Garden Center to sit on the opposite diagonals from the inset gardens. We used glass candle bowls that we found at the dollar store. Here is our final product!


The best thing about using the organizer trays is that we can change our minds! We can mix, match, and exchange the contents of the insets. We could do other types of sunken gardens like herbs or flowers (maybe with a built-in drainage system on the underside of the table). We could even inset decorative elements, like a miniature Zen garden.

Thanks so much for hearing about our DIY project! We have other IKEA Lack tables and we look forward to modifying – stay tuned to see what we do next. Do you have any ideas for future IKEA hacks we should try? Please share your thoughts with us in the comments below!
Until next time,
Kathy May and Silas

Ingenious and awesome …… way above and surpassing my egg tarts hack !!!!!!
By the way, the reason the cut part wouldn’t come off easily was because it was glued on ???
As well, I like the straw bamboo windbreaker in the background.
Thank you for the comment! The honeycomb is attached to the top and bottom panels by a drop of glue at each honeycomb intersection. The attachments are easy to break but it is difficult to lift the panel because you have nothing to hold onto. If you pry it up from the edge, you risk damaging the outside edge of the hole.
Nice work guys! I always love your projects. Glad to see that they’re up and running as your settle down in Boston. <3
Thank you! Feel free to share! Stay tuned for more projects!
You and Silas have more talent expressed in your Ikea table than I do in my entire life.