Our first major foray into home automation is an Arduino-controlled, Internet-connected thermostat for our apartment. Our HVAC (heating, ventilation, and air conditioning) unit doesn’t have a connection for an external thermostat, so we couldn’t just buy a Nest and hook it up. And of course it’s more fun to build and customize our own system, while learning about microcontrollers at the same time! We wanted to share our project with you; although it’s not a step-by-step tutorial, we hope that there is enough detail to inspire your own home automation projects!
We had been hearing about the Arduino for a while since attending our first NYC World Maker Faire a few years ago, and we decided that this was a perfect project to make use of one. Basically, an Arduino is an inexpensive microcontroller that can be programmed like a very simple computer to check inputs such as buttons and sensors, run some logic, and drive outputs such as lights and motors. A thermostat system, for example, would use a temperature sensor as an input to decide whether the HVAC should be on or off, and a servo motor and an output to physically control the HVAC unit. The Arduino by itself has no Internet capability, but add-on components that add Ethernet or WiFi abilities can easily be attached.
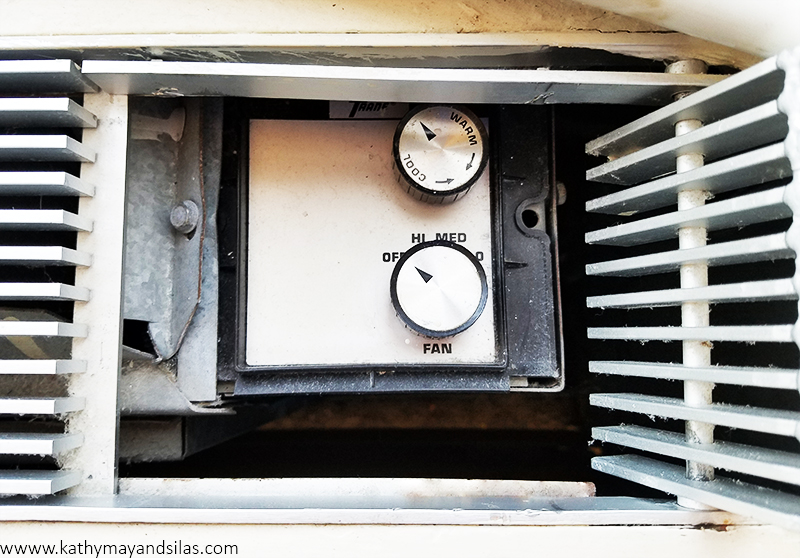
Our HVAC unit is controlled by a knob that turns the unit on or off, with several fan settings (high, medium, low). A second knob helps to control the amount of heating or cooling by cycling the heat transfer on and off. It’s not very efficient because the fan stays on at all times, and since you can’t set a temperature you basically have to guess how far to turn the knob to get the amount of heating or cooling you want. We wanted to build a system that would allow us to set a temperature like a thermostat and also to allow us to control system remotely (because who needs to go all the way across the room to turn the unit on and off?). Having it Internet-enabled would even allow us to turn the system on before reaching home, so that the apartment would already be warm when arriving home on those cold winter nights.
So far, our system has the following features:
- Measures and displays the current temperature in Celsius and Fahrenheit.
- Turns the HVAC unit on and off mechanically via the knob on the outside of the unit, in response to a direct on/off command or to maintain a set temperature.
- Reports the temperature and status to a web interface.
- Accepts commands through the web interface.
Here is a short video showing the system in action:
The system that we built has four principal components:
- Physical interface with the HVAC
- Arduino hardware not including the interface with the HVAC
- Arduino software (sketch)
- Web interface
In this post we will give an overview of each of these components. In future posts we hope to be able to go into each in a bit more detail.
1. Physical Interface with the HVAC
Instead of connecting to the wiring inside the control panel or to the power supply of the HVAC unit, we decided to build a mechanical interface to control the unit from the outside. This allows us to avoid working with high-voltage AC and allows the HVAC unit to be restored to its original condition easily. This mechanical interface obviously varies according to how the HVAC unit is designed, while the rest of the project is fairly independent of the design of the actual unit. Our HVAC unit is controlled by a knob that attaches to a shaft with a square cross-section. This is fortunate, because a servo motor can be used to turn the shaft directly on the same axis. A servo is a motor that can sense its own rotational position so that you can set it to turn to a specified position. This works well for us because we want to turn the shaft to the specified on and off positions.
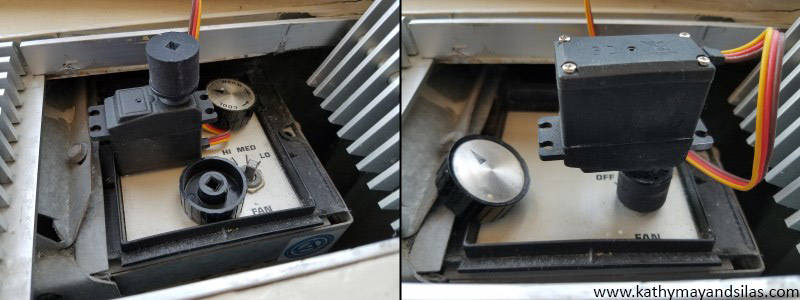
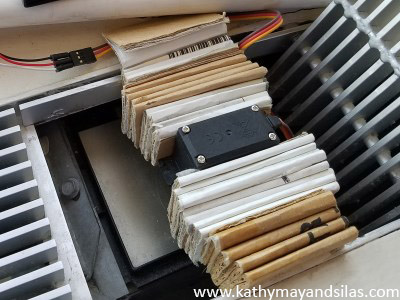 All that we need is a way to connect the servo to the shaft. Although we could have just glued the wheel horn directly to the knob, it would prevent us from restoring the HVAC to its original state. We thus 3D-printed a plastic knob with a square hole that we could permanently attach to the servo wheel horn. Since the geometry was not complex, we designed it quickly in Autodesk’s free 123D Design software. Since we don’t have a 3D printer (yet), we uploaded the design to Shapeways, which is a service that 3D-prints your design in whatever material you choose and ships it to you. The right image above shows the servo motor coupled to the HVAC control shaft.
In order to hold the servo in position and provide counter-torque when the servo is turning, we used cardboard temporarily to hold it against the sides of the cutout of the HVAC enclosure. In the future we would build a more permanent and elegant mount for the servo but this works for now.
Here is a video of the servo in action:
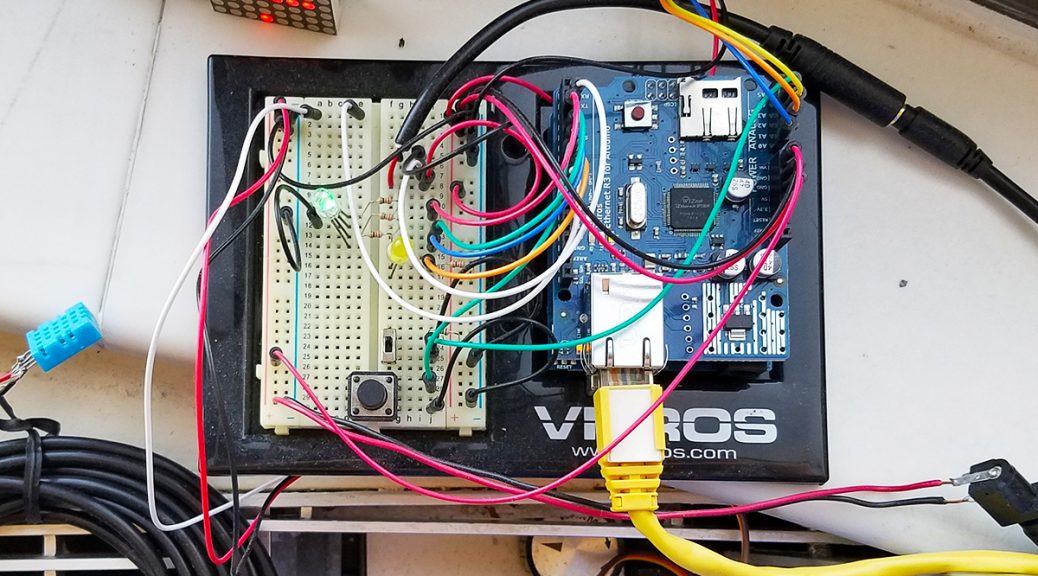
2. Arduino Hardware
For our prototype, we used an Arduino Uno compatible board, which uses the ATmega328 controller chip at its core. We also used an Ethernet shield, which is an add-on board that provides access to wired Internet. We chose Ethernet because it is simpler to configure than WiFi and is more reliable, which is better for initial experimentation.
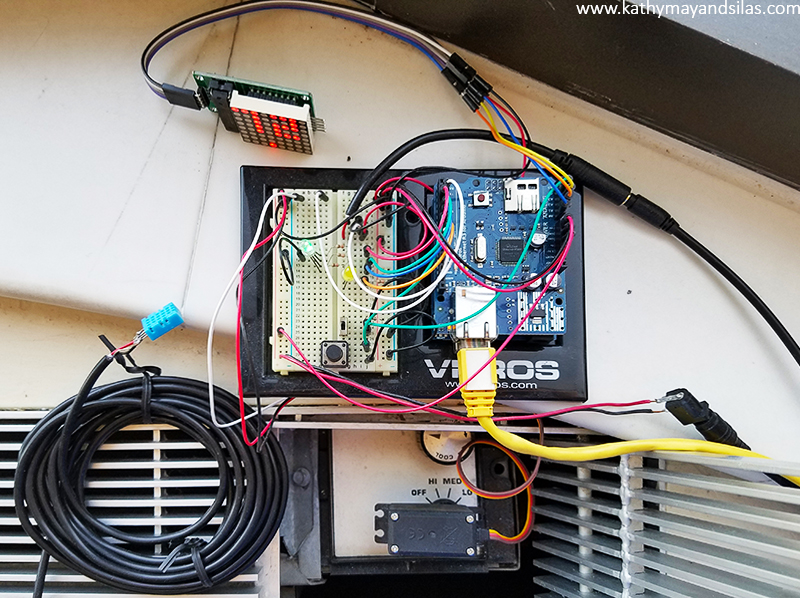
We used the following additional components for our project. Much of these came from online or Tinkersphere, a robot and electronics hobby shop in the Lower East Side of NYC.
- DHT11 temperature sensor (also measures humidity)
- Serial 8×8 LED matrix module with built-in MAX7219 driver chip, to display set and current temperatures
- Pushbutton to manually override the system to turn on or off
- RGB LED to indicate online status
- LED to indicate HVAC on/off status
- SPST switch to turn the temperature display on and off
- Breadboard, wires, resistors for the LEDs, DC barrel power jack for the AC adapter
The servo draws power directly from the AC adapter rather than the Arduino since the amount of current that the Arduino can supply is limited and the knob shaft requires a decent amount of torque to turn.
In order to get the temperature sensor further from the HVAC, we cut a 3.5 mm audio extension cable (which has 3 wires, matching the 3 connections that the DHT11 sensor needs) near the female end. The cut end of the short segment with the female jack connects directly to the board, and the cut end of the long segment with the male plug has the sensor soldered to it. Thus, in the future if we build an enclosure for the project, the temperature sensor can be plugged into the jack on the side of the enclosure like a pair of headphones plugs into a computer.
Although the system would have a web interface, we decided that it would also need a physical interface that shows the temperature and allows for manual control so that we wouldn’t have to go to the web all the time. We used a pushbutton to allow for override control to turn the HVAC on or off without thermostatic control. We used the 8×8 LED matrix to display the current and set temperatures in Celsius and Fahrenheit in a cycle that can be turned off with the switch.
3. Arduino Sketch
To program an Arduino to do what we want it to do, we write a program, or sketch, in a modified form of C/C++ using the free Arduino IDE (integrated development environment) on a computer. The sketch is then compiled and uploaded to the Arduino board via USB cable. It runs automatically when the board is powered up. Unlike a computer, there is no operating system or multitasking. The sketches are much simpler and smaller than your average computer program. On the popular Uno model of the Arduino, there is only 32 KB of program space and 2 KB of RAM! However, the power of the Arduino is in the ease with which the sketch communicates with the outside world through easy access to GPIO (general-purpose input and output) pins on the board.
Most home automation projects have very simple logic at their core, and so the Arduino has more than enough power to control this type of project. The logic behind a thermostat is very simple. If the room temperature is below the set temperature, turn the heat on. If the room temperature is above the set temperature plus a certain threshold, turn the heat off. And it would simply be the opposite for cooling.
Adding some bells and whistles such as communicating to a webserver does add to the complexity of the sketch, but the great thing about this kind of project is that you can add one piece of functionality at a time; it’s not necessary to plan out the whole project in advance.
Here is a basic schematic outline of our sketch. We hope to be able to go into a more detailed analysis in a future post. We used the following libraries: dht11 for the temperature sensor, Servo to control the servo, SPI and UIPEthernet for the Ethernet shield, SimpleTimer to run code at specified intervals, and LedControl for the LED matrix display.
The main thermostat function does the following: reconnect to the Internet if necessary, read the current temperature from the sensor, check the server for a new command, execute the thermostat logic (turn the HVAC system on or off depending on the temperature), send the current temperature and system status to the server, and display the current temperature on the LED matrix display.
The setup function connects to the Internet and sets up a timer to call the main thermostat function (above) each minute. The loop function checks the pushbutton that allows us to manually turn the unit on or off as well as the switch that turns the temperature display on the LED matrix on and off.
4. Web Interface
We want to be able to control and monitor the system using the web. This allows us to set the thermostat or simply turn the HVAC on or off without having to get up and walk all the way to the unit. It also allows us to start heating the apartment before reaching home!
The Internet-enabled Arduino can either be set up as a server or a client. With the Arduino as a server, we would send HTTP GET or POST requests to it directly to control the system, and it would serve up the user interface to our browser as HTML. However, we decided to use the Arduino as a client, requesting commands and posting its status to a hosted web service. Thus, the web server is an intermediary between our browser and the Arduino. This design has the advantages of not having to set up a static IP address for the Arduino, providing greater functionality (since the webserver has much more computing power than the Arduino itself), and allowing us to work on the user interface updates without having to remove and reprogram the Arduino.
Currently we have the Arduino set up to report the current temperature and system status (on or off, manual override or thermostat control) to the server once a minute. At the same time it will query the server to see if there is a new command. A simple web page provides an interface that we can access from any computer or smartphone, allowing us to see the temperature and status, as well as to change the set temperature or override it on or off.
Future Directions
There are some features that we have in mind that we are working on implementing in the future:
- Improving the web interface including designing a smartphone app
- Moving from the Arduino Uno to an Arduino Nano or other small version of the Arduino, and from breadboard to soldered perfboard
- Building a more permanent mount for the servo and an enclosure for the electronics
- Adding the ability to set programmed times with different temperatures – right now our schedules are not the same from one day to the next so this is not important to us
Even at this stage, we have been enjoying our first Arduino DIY home automation project! Being able to turn the heat on and off before reaching home makes living in the apartment much more comfortable, as does letting the Arduino maintain a steady temperature without having to get up and turn the unit on and off manually. We hope to go into more detail about each of these components sometime in the future, but hopefully this gives you a basic overview of our project. We hope that this gives you some inspiration and ideas for your own projects. Do you have any suggestions for our project? Please tell us about your Arduino and home automation projects in the comments!
Until next time,
Kathy May and Silas

Very good and extremely informative. Hope to see the updates and possibly upgrates soon.